
Primary keyword: Crochet scalloped Christmas tree ornament pattern
Secondary keywords: Crochet Christmas tree ornament, green crochet Christmas tree, scalloped crochet tree, handmade Christmas decorations, crochet shell stitch pattern, easy crochet Christmas ornament, DIY crochet holiday decor
Meta description: Crochet a festive green Christmas tree ornament with six scalloped tiers, silver edging, red bauble details, and a tiny star using this easy pattern.
Crochet Scalloped Christmas Tree Ornament Pattern
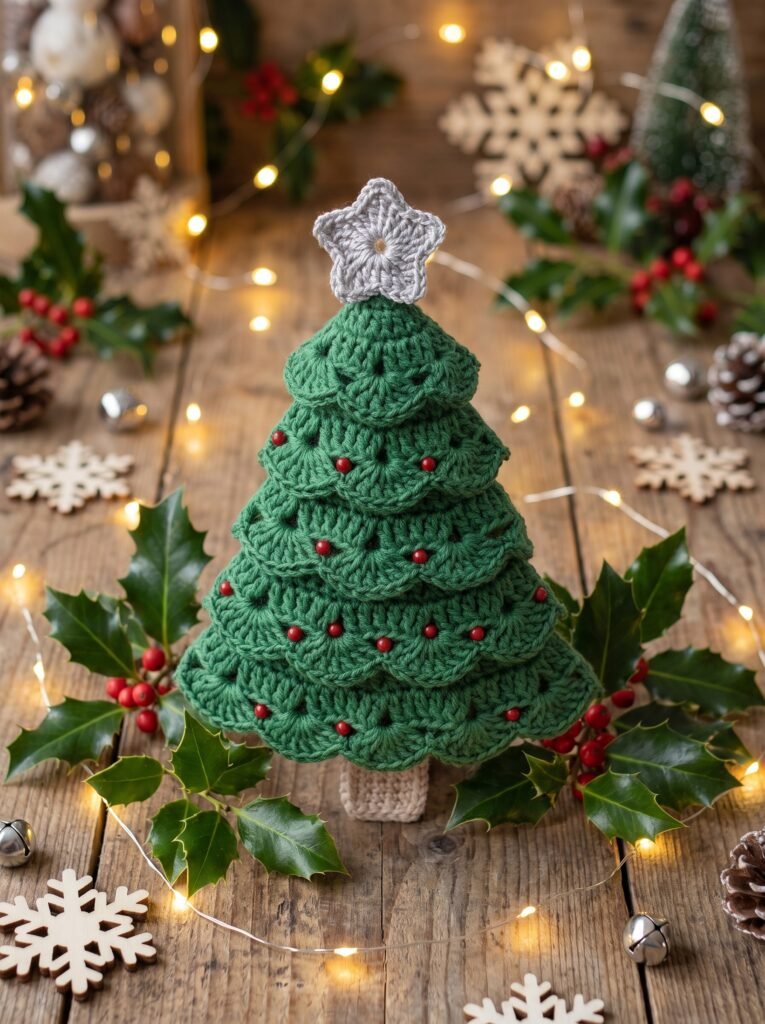
Create a charming handmade holiday decoration with this crochet scalloped Christmas tree ornament pattern. The design features six layers of green shell stitches, delicate silver edging, little red ornaments, and a silver star at the top. A small tan trunk completes the festive tree.
Each tier is crocheted separately and shaped with single crochet, double crochet, and a final row of scallops. The six pieces gradually increase in size, creating a layered tree with beautifully defined edges. Once the tiers are joined, the silver star, tan trunk, red decorative dots, and hanging loop bring the ornament together.
This project takes approximately 2.5–3 hours to complete and is suitable for confident beginners who know how to chain, single crochet, and double crochet. Using sport-weight cotton yarn and a small amount of metallic yarn, the finished ornament measures approximately 4.75 x 6.5 inches.
Hang your finished green tree on a Christmas tree, add it to a handmade holiday garland, or use it as a thoughtful seasonal gift.
Pattern Details
- Skill level: Easy
- Construction: Flat crochet appliqué
- Time needed: 2.5–3 hours
- Finished size: Approximately 4.75 inches wide x 6.5 inches tall
- Main yarn: Green sport-weight cotton
- Decorative colors: Silver, red, and tan
- Crochet terminology: US terms
Materials
Yarn
- Green or cream sport-weight (#2) cotton yarn, approximately 45 yards (41 m). Mercerized or matte cotton is suitable.
- Silver metallic yarn or fine/sport-weight crochet thread, approximately 12 yards (11 m). Metallic yarn with a soft core is generally easier to handle than stiff tinsel thread.
- Tan or light brown sport-weight cotton yarn, approximately 3 yards (3 m), for the trunk.
- Red embroidery floss or 21 red seed beads measuring 3–4 mm.
Crochet Hook
- 2.5 mm crochet hook (US B/1 or C/2).
- Optional: 2.75 mm hook for the silver edging if the metallic yarn feels too tight.
Notions
- Tapestry needle
- Sharp sewing needle and white thread if using beads
- Sewing pins or locking stitch markers
- Scissors
- Optional: white felt measuring 5 x 7 inches for a stiff backing
Crochet Abbreviations
The following abbreviations use US crochet terminology.
- ch: Chain
- sl st: Slip stitch
- sc: Single crochet
- hdc: Half double crochet
- dc: Double crochet
- sk: Skip
- st(s): Stitch(es)
- MR: Magic ring
- Shell: 5 dc worked into the same stitch
- **: Repeat the instructions between the asterisks as directed
- ( ): Stitch count at the end of the row
Before You Begin: Gauge
Make a small swatch in double crochet using your sport-weight cotton and 2.5 mm hook.
Your target gauge is 13 dc and 6 rows per 2 inches (5 cm). Gauge is not critical for this decorative ornament, but it affects the finished dimensions. A looser gauge will produce a larger tree.
Crochet Instructions
Part 1: Top Tier (Tier 1, Green)
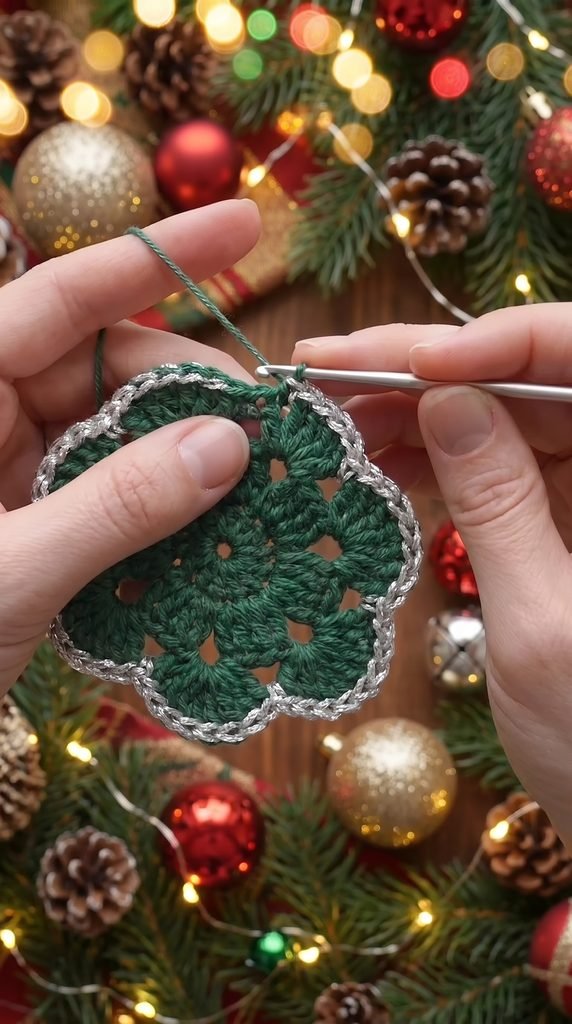
The first tier forms the pointed top of the tree. Work it in green yarn, shaping the piece with increases before creating the scalloped shell row.
Row 1
Ch 2, work 3 sc in 2nd ch from hook. (3 sc)
Row 2
Ch 1, turn. 2 sc in first st, sc in next st, 2 sc in last st. (5 sc)
Row 3
Ch 3 (counts as dc here and throughout), turn. Dc in the first st at the base of the ch, dc in next 3 sts, 2 dc in last st. (7 sts)
Row 4
Ch 3, turn. Dc in first st, dc in each st across to the last st (the top of the turning ch), 2 dc in last st. (9 sts)
Row 5 (Shells)
Ch 1, turn. Sc in first st, sk 1, 5 dc in next st, sk 1, sc in next st 2 times. Fasten off, leaving a 10 in tail. (2 shells, 13 sts)
Part 2: Tiers 2 to 6 (Green)
Crochet the remaining five tiers using the same four-row structure. The only difference between tiers is the starting chain length, which determines the number of shells in each layer.
Starting Chains and Shell Counts
- Tier 2: Ch 10 (3 shells)
- Tier 3: Ch 14 (4 shells)
- Tier 4: Ch 18 (5 shells)
- Tier 5: Ch 22 (6 shells)
- Tier 6: Ch 26 (7 shells)
Each tier’s Row 1 matches the width of Row 4 / Row 3 of the tier above, allowing the layers to fit together neatly.
Row 1
Ch the number listed for your tier. Sc in 2nd ch from hook and in each ch across.
Stitch counts:
- Tier 2: 9 sc
- Tier 3: 13 sc
- Tier 4: 17 sc
- Tier 5: 21 sc
- Tier 6: 25 sc
Row 2
Ch 3, turn. Dc in first st, dc in each st across to last st, 2 dc in last st.
Stitch counts:
- Tier 2: 11 sts
- Tier 3: 15 sts
- Tier 4: 19 sts
- Tier 5: 23 sts
- Tier 6: 27 sts
Row 3
Ch 3, turn. Dc in first st, dc in each st across to the last st (the top of the turning ch), 2 dc in last st. Count carefully.
Stitch counts:
- Tier 2: 13 sts
- Tier 3: 17 sts
- Tier 4: 21 sts
- Tier 5: 25 sts
- Tier 6: 29 sts
Row 4 (Shells)
Ch 1, turn. Sc in first st, sk 1, 5 dc in next st, sk 1, sc in next st repeat across, ending with sc in the last st. Fasten off, leaving a 12 in tail for sewing.
Shell counts:
- Tier 2: 3 shells
- Tier 3: 4 shells
- Tier 4: 5 shells
- Tier 5: 6 shells
- Tier 6: 7 shells
Part 3: Silver Scallop Edging (All 6 Tiers)
Use silver metallic yarn to outline the scalloped edge of every green tier. Keep your stitches relaxed so the shell shapes remain flat.
Row 1
With the right side facing, join silver yarn with a sl st in the first sc of the shell row. Ch 1, sc in the same sc, sc in next 2 dc, 2 sc in the center dc, sc in next 2 dc, sc in next sc repeat across every shell. Fasten off and weave in the ends on the back.
Stitch counts:
- Tier 1: 15 sc
- Tier 2: 22 sc
- Tier 3: 29 sc
- Tier 4: 36 sc
- Tier 5: 43 sc
- Tier 6: 50 sc
Part 4: Star (Silver)
The small silver star sits at the top of the finished tree.
Round 1
Make a MR. Ch 1, work 10 sc into the ring, pull the ring closed until only a small hole remains, sl st to the first sc. (10 sc)
Round 2 (Points)
Ch 4, sl st in 2nd ch from hook, sc in next ch, hdc in next ch, sk next sc on the round, sl st in next sc 5 times, working the last sl st into the joining st. Fasten off, leaving an 8 in tail. (5 points)
Part 5: Trunk (Tan)
Crochet the small trunk in tan yarn to provide a natural contrast against the green tree.
Row 1
Ch 6, sc in 2nd ch from hook and in each ch across. (5 sc)
Rows 2–7
Ch 1, turn, sc in each st across. Fasten off after Row 7, leaving an 8 in tail. (5 sc)
Part 6: Hanging Loop (Green)
Make the hanging loop with green yarn.
Row 1
Leaving a 6 in tail, ch 36 (about 6 in). Fasten off, leaving a second 6 in tail. (36 ch)
Assembly
Once all six tiers, the star, the trunk, and the hanging loop are complete, assemble the ornament by following these steps in order.
Step 1: Block the Tiers
Block all six tiers before sewing. Pin them flat on a towel, spritz with water, and allow them to dry. This helps the shells open into neat half circles.
Step 2: Position Tier 2
Lay Tier 1 right side up. Place Tier 2 behind it so the top two rows of Tier 2 (the sc row and the first dc row) remain hidden behind Tier 1’s shells. Tier 2’s sc row is 9 sts, matching the width of Tier 1’s Row 4, so the edges line up.
Step 3: Sew Tier 2
Pin the pieces in place. Use Tier 2’s tail to whipstitch its sc foundation to the back of Tier 1’s Row 4, catching only the back bumps so the stitches remain invisible from the front.
Step 4: Attach the Remaining Tiers
Repeat the same process for Tiers 3, 4, 5, and 6. Tuck each tier behind the one above it so its 13, 17, 21, or 25 sc foundation lines up with Row 3 of the tier above. Keep the centers aligned to maintain a straight tree shape.
Step 5: Attach the Trunk
Center the trunk behind Tier 6. Keep Rows 1–2 hidden behind the shells, allowing Rows 3–7 to extend below the tree. Whipstitch the trunk securely to the back of Tier 6.
Step 6: Add the Red Decorative Dots
Place the red dots on the green tiers, positioning each one in a dip between two shells, just above the silver line.
Add the dots as follows:
- Tier 1: 1 dot
- Tier 2: 2 dots
- Tier 3: 3 dots
- Tier 4: 4 dots
- Tier 5: 5 dots
- Tier 6: 6 dots
This gives you 21 decorative dots in total. Sew on the seed beads using white thread, or make French knots with 3 strands of red floss wrapped twice.
Step 7: Attach the Hanging Loop
Fold the hanging loop in half and position both tails behind the tip of Tier 1. Thread the tails through the top stitches, tie a secure knot, and weave in the ends.
Step 8: Sew on the Star
Use the silver tail to sew the star to the tip of Tier 1. Position it so the bottom two points overlap the green tree and the hanging loop rises from behind the top point.
Step 9: Add an Optional Felt Backing
Trace the completed tree onto white felt and cut just inside the outline. Glue or whipstitch the felt to the back to conceal the sewing and give the ornament additional stiffness.
Finishing Your Green Crochet Christmas Tree
Weave in every remaining tail on the back of the tree, passing each end beneath a few stitches of its matching yarn color so it stays secure and does not show through the green fabric.
Lay the finished tree flat on a towel, mist it lightly with water, and allow it to dry. This final blocking step helps the scalloped edges settle into even half circles.
If you want a firmer ornament, sew a piece of white felt onto the back before attaching the hanging loop. Hand wash only if necessary, and always allow the ornament to dry flat.
Your green scalloped Christmas tree is now ready to hang on a Christmas tree, decorate a holiday wreath, or become part of your handmade seasonal collection.
Tips for Success
Check the Finished Measurements
With the suggested yarn and hook, the tree should measure approximately 4.75 in (12 cm) wide at the bottom tier and 6.5 in (16.5 cm) tall from the star tip to the bottom of the trunk, excluding the loop.
Remember That the Turning Chain Counts
The ch 3 at the beginning of a dc row counts as a stitch. The final increase in each dc row must be worked into the top of the turning chain from the previous row.
Check the Stitch Count Before Making Shells
The shell row needs a multiple of 4 sts plus 1. Each tier is designed to reach the required count of 9, 13, 17, 21, 25, or 29 sts. If Row 3 has the wrong number of stitches, correct it before beginning the shell row.
Adjust the Size if Needed
For a larger tree, use worsted (#4) cotton and a 4.5 mm hook to make a tree around 8.5 in wide. For a miniature version, use size 10 crochet thread with a 1.75 mm hook to create a tree approximately 3 in wide.
Keep the Scallops Flat
If the shells ruffle instead of lying flat, try a slightly smaller hook for the shell row only, or work 4 dc instead of 5 in each shell. The edging count will then decrease by 1 per shell.
Common Mistakes to Avoid
Forgetting the Turning Chain
In the double crochet rows, the ch 3 counts as the first stitch. Work the first increase into the stitch at the base of that chain, and place the final 2 dc into the top of the turning chain from the previous row. Missing that last stitch will leave you short before the shell row.
Skipping the Stitch Count
The shell row requires a multiple of 4 plus 1. If the count is off by even one stitch, the final scallop may look uneven. Check Row 3 of every tier before continuing.
Pulling the Metallic Yarn Too Tightly
Silver metallic yarn has very little stretch. Tight stitches can pull the scallops forward and cause the edges to curl. Work the edging loosely, and switch to a larger hook if needed.
Sewing the Tiers Too Low
Each new tier should overlap the one above just enough to hide its sc row and first dc row behind the scallops. Excessive overlap can flatten the tree and conceal the shell details.
Ways to Customize This Crochet Pattern
Try Different Holiday Color Combinations
The green tree with silver edging and red decorative dots creates a traditional Christmas look. You can also experiment with gold edging and tiny multicolor beads, or make a Scandinavian-inspired version using natural cream tiers, red edging, and no beads.
Make a Smaller Ornament
For a smaller decoration, stop after Tier 4. This creates a four-layer tree approximately 3.5 inches wide.
Create a Larger Tree
For a wall hanging, use worsted cotton and a 4.5 mm hook. The same instructions will produce a tree close to twice the size.
Make a Two-Sided Ornament
Crochet two complete trees and sew them back to back with a little stuffing between them. The result is a soft, padded ornament that looks attractive from both sides.
Frequently Asked Questions
How long does this crochet Christmas tree ornament take to make?
Plan on approximately 2.5–3 hours for one ornament. Your actual time will depend on your crochet speed, experience, and the time needed for sewing and finishing.
Is this pattern suitable for beginners?
The pattern is rated easy and is suitable for confident beginners who know how to chain, single crochet, and double crochet. Familiarity with sewing crochet pieces together is also helpful.
What yarn is best for this scalloped Christmas tree?
Sport-weight (#2) cotton is recommended for the six green tiers. Silver metallic yarn or fine crochet thread works for the edging and star, while tan cotton is used for the trunk.
How many scallops does the tree have?
The six tiers contain 2, 3, 4, 5, 6, and 7 shells, respectively, for a total of 27 shells across the finished tree.
How many red ornaments are needed?
You will need 21 red dots in total. Use 21 red seed beads measuring 3–4 mm, or create the dots with red embroidery floss.
Can I make the ornament bigger or smaller?
Yes. Use the recommended sport-weight cotton and 2.5 mm hook for the stated size. Worsted (#4) cotton with a 4.5 mm hook produces a larger tree, while size 10 crochet thread with a 1.75 mm hook creates a miniature version.
How should I store my crochet Christmas ornament?
Make sure the ornament is completely dry before storing it. Keep it flat in a clean, dry container to help protect the shell edges and decorative details between holiday seasons.
Image Alt Text Suggestions
Use descriptive alt text for relevant photographs of the finished ornament and the main tutorial stages.
- Finished ornament: Green crochet scalloped Christmas tree ornament with silver edging, red decorative dots, a silver star, and a tan trunk.
- Top tier tutorial: Crocheting the first green shell-stitch tier for a handmade Christmas tree ornament.
- Layered tiers: Six green crochet Christmas tree tiers arranged from smallest to largest before assembly.
- Silver edging: Adding silver metallic crochet edging to the scalloped shells of a green Christmas tree ornament.
- Assembly process: Sewing the six green crochet tiers together to form a layered Christmas tree.
- Finished decoration: Handmade green crochet Christmas tree ornament with a silver star and hanging loop.
Final Thoughts

This crochet scalloped Christmas tree ornament is a lovely way to add handmade charm to your holiday decorations. Its six green tiers, shimmering silver edging, red baubles, and tiny star combine familiar Christmas colors with a delicate shell-stitch texture.
Make one for your own Christmas tree, create several for handmade gifts, or experiment with the suggested size variations to suit your decorating plans. With a little cotton yarn and a few decorative details, you can crochet a festive ornament to enjoy year after year.
Pattern attribution and permissions: Before publishing this rewritten tutorial, confirm that you have the original designer’s permission or a license allowing republication and adaptation. Paraphrasing the wording and changing the colors do not remove copyright restrictions. Retain any required attribution and follow the original pattern’s licensing terms.


