About This Christmas Evergreen Vine Table Runner
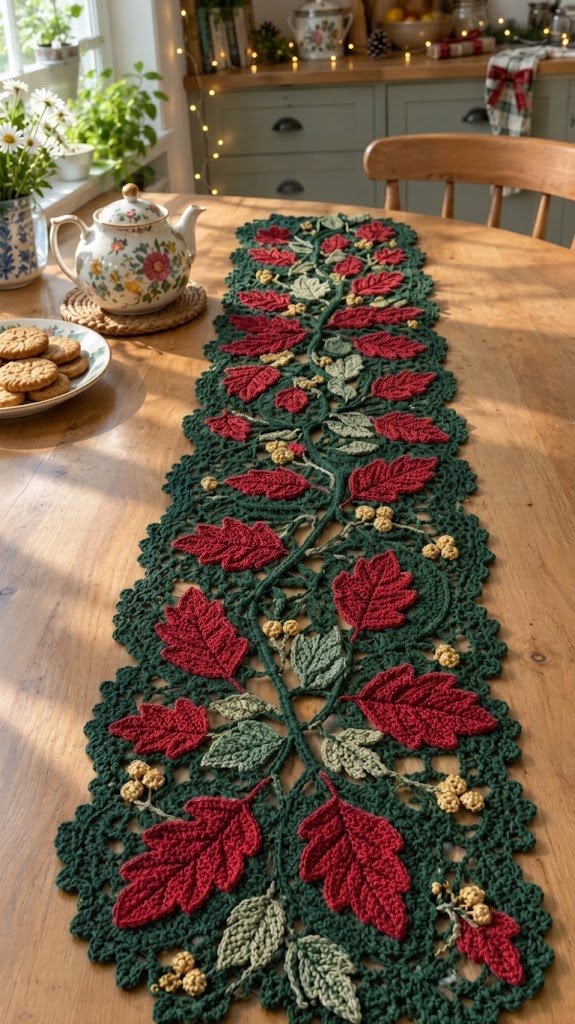
Bring a traditional Christmas color palette to the dining table with this detailed botanical crochet runner. The design combines an open forest-green lace background with raised evergreen vines, curling tendrils, rich red oak-style leaves, smaller sage-green leaves, and clusters of warm golden berries.
The finished piece has a dimensional appearance because the decorative motifs are crocheted separately and attached to the lace after blocking. The raised vine gives the design a natural flowing movement, while the red leaves provide a strong festive contrast against the green background.
The border is finished with decorative scallops and picots, giving the runner a delicate lace edge. The combination of open mesh, textured leaves, padded vines, and three-dimensional berries makes this an eye-catching Christmas centerpiece.
This is an advanced crochet project and involves several different techniques, including open mesh crochet, treble crochet, working around both sides of foundation chains, reverse single crochet, picots, surface slip stitches, padded crochet cords, shaping, blocking, and hand-sewn motif assembly.
Because the project contains many individual pieces, it is easy to divide the work into smaller sessions. You can make a few leaves or berries at a time and assemble everything once the crochet components are complete.
The completed runner measures approximately 42 × 105 cm, making it suitable for many rectangular dining tables.
For the Christmas version, the original cream leaves are replaced with Christmas red, creating a classic red-and-green holiday design with gold accents.
Finished Measurements
Approximately:
- Width: 42 cm
- Length: 105 cm
- Mesh panel before border: approximately 36 × 99 cm
- Estimated working time: 30–40 hours
- Skill level: Advanced
Measurements can vary slightly depending on yarn thickness, crochet tension, blocking, and the firmness of your stitches.
Christmas Color Palette
The main colors used in this version are:
- Forest green — mesh, border, main vine, branches, and tendrils
- Christmas red — large and small oak-style leaves
- Sage green — ribbed leaves, stems, and veins
- Mustard gold — berries
The combination creates a traditional Christmas appearance while keeping the botanical character of the original design.
For an especially festive look, choose a deep ruby or cranberry red rather than a very bright orange-red.
Materials
Yarn
Forest Green
Worsted-weight cotton yarn, approximately 600 m.
Use this for:
- Mesh panel
- Scalloped border
- Main vine
- Eight branches
- Six curling tendrils
Christmas Red
Worsted-weight cotton yarn, approximately 280 m.
Use this for:
- 10 large oak-style leaves
- 12 small oak-style leaves
This is the main replacement for the cream yarn in the Christmas version.
Sage Green
Worsted-weight cotton yarn, approximately 110 m.
Use this for:
- 10 ribbed sage leaves
- Leaf stems
- Leaf veins
- Berry cluster stems
Mustard Gold
Worsted-weight cotton yarn, approximately 60 m.
Use this for:
- 36 berries
- Small amounts of yarn stuffing
Using yarn scraps as stuffing helps prevent light-colored stuffing from showing through the berry stitches.
Hooks and Other Supplies
- 4.0 mm crochet hook
- 3.5 mm crochet hook
- At least 6 stitch markers
- Large-eye tapestry needle
- Blunt-tip sewing needle
- Rust-resistant blocking pins
- Blocking mats large enough for approximately 42 × 105 cm
- Spray bottle
- Scissors
- Clean towel for blocking
A 4.5 mm hook can also be useful for making the foundation chain if you naturally crochet tightly.
Abbreviations
- ch — chain
- sl st — slip stitch
- sc — single crochet
- hdc — half double crochet
- dc — double crochet
- tr — treble crochet
- rev sc — reverse single crochet, worked from left to right
- inc — increase; 2 sc worked into the same stitch
- dec — decrease; sc2tog
- MR — magic ring
- BLO — back loop only
- picot — ch 3, sl st into third ch from hook
- PL — picot loop; ch 2, picot, ch 2
- st/sts — stitch/stitches
- sp — space
- rep — repeat
- rnd — round
Before You Start
The foundation chain for the mesh needs to remain loose.
If your chains tend to be tight, make the foundation chain with a 4.5 mm hook, then change to the 4.0 mm hook for the first row.
A tight foundation chain can pull the first short edge inward. Once the border has been added, blocking may not be enough to completely correct the uneven edge.
Before beginning the full runner, make a few mesh loops as a tension check.
The mesh should be open and flexible rather than stiff.
Picot Mesh Panel
Color: Forest green
Hook: 4.0 mm
Chain 66 loosely.
Row 1
Sc in the sixth chain from the hook.
Repeat:
ch 5, skip the next 3 chains, sc in the following chain.
Continue across.
Turn.
16 loops
Row 2
Ch 5, counting as the first loop.
Sc in the first ch-5 space.
Then work:
[PL, sc in next ch-5 space]
Repeat 15 times.
Work the final sc into the loop formed by the skipped chains at the beginning of Row 1.
Turn.
16 loops
Row 3
Ch 5, counting as the first loop.
Sc in the first loop.
Then work:
[PL, sc in next loop]
Repeat 15 times.
Work the final sc into the turning ch-5 loop from the previous row.
Turn.
Rows 4–55
Repeat Row 3.
Maintain 16 loops across every row.
Do not fasten off.
Mesh Size Check
Before beginning the border, measure the panel.
It should be approximately:
36 × 99 cm
Approximately four loops by five rows should measure around 9 cm.
If you want to change the length, add or remove rows in pairs so the total number of rows remains odd.
The border instructions are based on the 55-row panel, so substantial size changes require corresponding border adjustments.
Three-Round Scalloped Border
Color: Forest green
Round 1
Ch 1 and rotate the work so you can crochet down the long side.
At the first corner, work:
- 3 sc in the corner
- 165 sc along the long edge
- 3 sc in the next corner
- 63 sc across the short edge
For the long edge, work 3 sc into each of the 55 row ends.
For the short edge, work 4 sc into each of the first 15 loops and 3 sc into the final loop.
Repeat the same construction around the remaining sides.
On the second short edge, work into the spaces created by the original foundation chain.
Join with a sl st to the first sc.
468 stitches
Place a stitch marker in the center stitch of every 3-sc corner group.
These markers will help keep the corner shells correctly positioned.
Border Round 2
Sl st into the next stitch, which should be the marked center stitch of the corner.
Ch 3, counting as the first dc.
Work 8 dc into the same stitch.
This forms the first corner shell.
Work the side pattern:
[skip 2 sts, sc in next st, skip 2 sts, 7 dc in next st]
Repeat 27 times.
Then work:
skip 2 sts, sc in next st, skip 2 sts, 9 dc in next st.
This creates the next corner shell.
Continue around the runner using the same construction.
The completed round contains:
- 4 corner shells
- 74 side shells
- 78 sc
Join with a sl st to the top of the beginning ch-3.
Border Round 3
Ch 1.
Use the following two edging sequences.
Corner Edging
Sc in the next 4 dc.
Work:
(sc, picot, sc)
in the next dc.
Sc in the following 4 dc.
Sl st into the next sc.
Side Scallop
Sc in the next 3 dc.
Work:
(sc, picot, sc)
in the next dc.
Sc in the next 3 dc.
Sl st into the following sc.
Starting at the joining point, work:
- 1 Corner
- 27 Side scallops
- 1 Corner
- 10 Side scallops
- 1 Corner
- 27 Side scallops
- 1 Corner
- 10 Side scallops
Join with a sl st.
Fasten off and weave in all ends on the wrong side.
Main Raised Vine
Color: Forest green
Hook: 4.0 mm
The vine uses a padded cord to create a raised, rope-like appearance.
Cut approximately 250 cm of forest-green yarn and fold it in half.
This doubled strand becomes the padding cord.
Chain 201.
Row 1
Hold the padding cord alongside the foundation chain.
Sc in the second chain from hook and in every chain across.
Make sure the padding cord is enclosed inside the stitches as you work.
200 sc
Row 2
Do not turn.
Ch 1.
Work rev sc across all 200 stitches.
The reverse single crochet creates a raised ridge and helps the vine look more like a small twisted stem.
Fasten off, leaving approximately 40 cm for sewing.
Leave the ends of the padding cord loose for now.
Gently shape the vine into soft S-curves.
Avoid making the curves too sharp because the finished vine should have a natural flowing appearance.
Branches
Make 8
Color: Forest green
Hook: 4.0 mm
For each branch, use approximately 40 cm of forest-green yarn folded in half as the padding cord.
Ch 26.
Work:
- Row 1: 25 sc over the padding cord
- Row 2: 25 rev sc
Fasten off, leaving approximately 25 cm for sewing.
Shape the branches gently before attaching them.
Curled Tendrils
Make 6
Color: Forest green
Hook: 4.0 mm
Ch 16.
Row 1
Work 2 sc into the second chain from hook and continue with 2 sc in each remaining chain.
30 sc
The increases create a strip that naturally twists and curls.
Fasten off, leaving approximately 25 cm for sewing.
Coil each tendril into a loose, flat spiral.
Pin the spiral temporarily so it keeps its shape until final assembly.
Large Red Oak-Style Leaves
Make 10
Color: Christmas red
Hook: 3.5 mm
These leaves replace the cream leaves from the original colorway.
The red shade should be rich enough to contrast strongly against the forest-green mesh.
Round 1
Ch 17.
Sc in the second chain from hook.
Then work:
- hdc in next ch
- dc in next 3 ch
- tr in next 6 ch
- dc in next 3 ch
- hdc in next ch
- 5 sc in final ch
Continue around the opposite side of the foundation chain:
- hdc in next ch
- dc in next 3 ch
- tr in next 6 ch
- dc in next 3 ch
- hdc in next ch
- sc in the same chain as the first sc
Sl st to the first sc.
35 sts
Round 2
Ch 1.
Tip
Work:
(sc, picot, sc)
in the first stitch.
First Side
Sc in next stitch.
Repeat four times:
[sc in next st, (hdc, dc, picot, dc, hdc) in next st, sl st in next st]
Sc in next stitch.
Base
Sc in next 2 sts.
Work 3 sc into the next stitch.
Sc in the next 2 sts.
Second Side
Sc in next stitch.
Repeat four times:
[sl st in next st, (hdc, dc, picot, dc, hdc) in next st, sc in next st]
Sc in next stitch.
Finish with sc in the final stitch.
Sl st to the first sc.
62 sts plus 9 picots
Fasten off, leaving approximately 40 cm for sewing.
Red Leaf Stem
Join sage-green yarn at the center of the leaf base.
Ch 9.
Sl st into the second chain from hook and across the remaining chains.
You should have 8 sl sts.
Sl st back into the leaf base.
Fasten off.
Red Leaf Vein
Using sage-green yarn, work a surface slip stitch along the center of the leaf from the base toward the tip.
Add four straight-stitch veins on each side.
Angle each side vein upward toward the corresponding leaf lobe.
The sage-green veins add a subtle botanical detail to the red leaves without overwhelming the Christmas color scheme.
Small Red Oak-Style Leaves
Make 12
Color: Christmas red
Hook: 3.5 mm
Ch 11.
Round 1
Sc in the second chain from hook.
Then:
- hdc in next ch
- dc in next 2 ch
- tr in next 3 ch
- dc in next ch
- hdc in next ch
- 5 sc in final ch
Continue around the opposite side:
- hdc in next ch
- dc in next ch
- tr in next 3 ch
- dc in next 2 ch
- hdc in next ch
- sc in the same chain as the first sc
Sl st to the first sc.
23 sts
Round 2
Ch 1.
Tip
(sc, picot, sc) in the first stitch.
First Side
Sc in next stitch.
Repeat twice:
[sc in next st, (hdc, dc, picot, dc, hdc) in next st, sl st in next st]
Sc in next stitch.
Base
Sc in next 2 sts.
Work 3 sc in next stitch.
Sc in next 2 sts.
Second Side
Sc in next stitch.
Repeat twice:
[sl st in next st, (hdc, dc, picot, dc, hdc) in next st, sc in next st]
Sc in next stitch.
Finish with sc in the final stitch and sl st to the beginning.
38 sts plus 5 picots
Fasten off, leaving approximately 30 cm for sewing.
Small Red Leaf Stem and Vein
Join sage-green yarn at the base.
Ch 6.
Sl st from the second chain from hook through the remaining chains.
Attach the stem to the leaf base.
Add a surface-slip-stitch center vein and two straight-stitch side veins on each side.
Ribbed Sage Leaves
Make 10
Color: Sage green
Hook: 3.5 mm
Ch 12.
Row 1
Sc in the second chain from hook and in the next 9 chains.
Work 3 sc into the final chain.
Continue along the opposite side of the chain with 9 sc.
Turn.
22 sts
Row 2
Ch 1.
Working in BLO:
- sc in next 10 sts
- 3 sc in next st
- sc in next 8 sts
Leave the final 3 stitches unworked.
Turn.
21 sts
Row 3
Ch 1.
Working in BLO:
- sc in next 9 sts
- 3 sc in next st
- sc in next 8 sts
Leave 3 sts unworked.
Turn.
20 sts
Row 4
Ch 1.
Working in BLO:
- sc in next 9 sts
- 3 sc in next st
- sc in next 7 sts
Leave 3 sts unworked.
Turn.
19 sts
Row 5
Ch 1.
Working in BLO:
- sc in next 8 sts
- 3 sc in next st
- sc in next 7 sts
Leave 3 sts unworked.
18 sts
Stem
Do not fasten off.
Ch 7.
Sl st into the second chain from hook and across the remaining chains.
Sl st into the leaf base.
Fasten off, leaving approximately 25 cm for sewing.
The BLO construction creates raised ribs along the leaf, so an embroidered center vein is not required.
Golden Christmas Berries
Make 36
Color: Mustard gold
Hook: 3.5 mm
Work the berries continuously.
Round 1
Work 6 sc into a MR.
6 sts
Round 2
[sc in next st, inc]
Repeat three times.
9 sts
Round 3
Sc in every stitch around.
9 sts
Stuff firmly using small pieces of mustard-gold yarn.
Avoid overstuffing because the berries should remain small and rounded.
Round 4
[sc in next st, dec]
Repeat three times.
6 sts
Fasten off.
Thread the yarn tail through the front loops of the remaining six stitches.
Pull the opening closed.
Keep the tail for sewing.
Golden Berry Cluster Stems
Make 12
Color: Sage green
Ch 10.
Sl st into the second chain from hook and across.
9 sl sts
Fasten off, leaving approximately 20 cm for sewing.
Attach three gold berries in a compact triangular arrangement to one end of each stem.
You will have:
12 clusters × 3 berries = 36 berries
Blocking the Christmas Runner
Blocking is especially important for this project because it determines the final shape of the open mesh and the scalloped border.
Wet the completed mesh gently.
Press out excess water using a clean towel.
Do not wring or twist the piece.
Place it on blocking mats and carefully pin it to approximately:
42 × 105 cm
Stretch the mesh evenly rather than pulling aggressively.
Pin every scallop and picot along the border.
Allow the piece to dry completely before removing the pins.
Block all the red and sage leaves separately.
Pay particular attention to the pointed edges and picots of the red oak leaves.
Allow every motif to dry completely.
Planning the Christmas Arrangement
Once everything is dry, place the runner right side up on a large table.
Do not begin sewing immediately.
Arrange every component first.
Start with the main green vine.
Place it through the center of the runner in gentle S-curves.
Keep approximately 5 cm of space from the border at each end.
Add the eight branches beneath the main vine.
Space them at approximately 12 cm intervals, alternating the direction of the branches.
Place the six curled tendrils into the open curves.
Next, add the large red leaves.
Arrange them in alternating pairs along the vine.
Place the larger red leaves toward the two ends of the runner.
Allow each leaf to overlap a section of vine or branch by approximately 1 cm.
Add the smaller red leaves to fill open spaces.
Then place the sage-green ribbed leaves partly underneath selected red leaves.
This layering helps the red leaves appear to sit naturally among the greenery.
Finally, add the 12 gold berry clusters.
Try to distribute them evenly rather than placing all the berries in one area.
Take a photograph of the entire layout before removing any motifs.
This photograph will make assembly much easier.
Sewing the Christmas Motifs
Begin at the center of the runner and work toward the ends.
This helps prevent the mesh from gradually shifting while you sew.
Attach the Vine
Use the long sewing tails to secure the main vine.
Work small whip stitches through the back loops of the vine while catching the mesh beneath.
Keep the stitches firm enough to hold the vine securely but loose enough that the mesh remains flat.
Attach the Branches
Position each branch underneath the main vine.
Secure the branch first, then attach its joining point to the main vine.
Attach the Tendrils
Place each spiral in its planned position.
Use small stitches around several points of the spiral rather than securing only the center.
This keeps the tendrils flat while preserving their curved shape.
Attach the Red Leaves
Use the long tails left from making the leaves.
Secure the leaf around its outer edge and at the base.
Place small stitches near the picot points so they cannot lift or snag.
Do not sew every stitch tightly.
The leaf should remain slightly raised above the mesh.
Attach the Sage Leaves
Place the sage leaves slightly underneath the red leaves where possible.
Secure their stems and outer edges.
The overlapping layers create depth.
Attach the Gold Berry Clusters
Secure each cluster through its stem.
Then add a few stitches through the base of each individual berry.
Make sure all three berries are firmly attached.
Final Finishing
Weave all remaining yarn ends securely on the wrong side.
Trim the ends neatly once they are secure.
Inspect the front of the runner for loose threads, uneven leaves, or areas where the mesh has been pulled.
If necessary, gently reshape the runner.
Use light steam from the wrong side to settle the stitches.
Avoid pressing the iron directly onto the raised leaves, vine, tendrils, or berries.
Allow the runner to cool and dry completely before placing it on the table.
Tips for Success
- Use the 3.5 mm hook for all leaves and berries. The smaller hook produces firmer motifs and helps the red leaf points stay crisp.
- Use the 4.0 mm hook for the mesh and vine so the lace remains open and flexible.
- Count the mesh loops at the end of every row.
- Correct missing loops immediately rather than continuing several rows.
- Keep the corner stitch markers in place during the border.
- Stuff all gold berries to approximately the same firmness.
- Work on a large flat table when arranging and sewing the motifs.
- Take a photograph before sewing.
- Keep your sewing tension relaxed.
- Block the runner before assembly rather than after attaching all the motifs.
- Allow the leaves to dry completely while pinned so the pointed edges retain their shape.
Common Mistakes to Avoid
Losing a Mesh Loop
The beginning ch-5 functions as a loop.
The final sc of the following row needs to be worked into the appropriate turning loop.
If this is missed repeatedly, the mesh will become narrower.
Working Sage Leaves Through Both Loops
The ribbed effect depends on working the specified rows in BLO.
Working through both loops will make the leaves much flatter.
Making the Red Oak Leaves Too Loose
If the treble section becomes too loose, the leaf may curl or become ruffled.
Try using a smaller hook or adjusting your tension.
Overstuffing the Berries
Too much stuffing can make the berries oversized and uneven.
Use enough yarn scraps to create a firm rounded shape without stretching the stitches.
Pulling Sewing Stitches Too Tight
Tight attachment stitches can draw the mesh inward and create puckering.
The motifs should be secure while the mesh underneath remains flat.
Changing the Mesh Without Recalculating the Border
Changing the number of loops or rows affects the border placement.
If you modify the dimensions, recalculate the border rather than automatically using the original stitch counts.
Christmas Color Variations
Classic Christmas
Use:
- Deep forest green
- Traditional Christmas red
- Sage green
- Warm gold
This is the recommended color combination for a traditional holiday table.
Burgundy Christmas
Replace bright red with burgundy or wine red.
The darker leaves create a sophisticated look that works especially well with gold berries.
Ruby and Gold
Use vivid ruby-red leaves with dark green mesh and bright golden berries.
This version has a brighter, more decorative holiday appearance.
Traditional Red and White
Use red leaves and replace the sage leaves with white or ivory.
Keep the green mesh and gold berries.
Winter Forest
Use deep green mesh, burgundy leaves, muted sage foliage, and antique-gold berries.
This creates a more understated winter holiday style.
Ways to Customize the Christmas Runner
Smaller Christmas Centerpiece
For a shorter centerpiece, reduce the number of mesh rows.
A 25-row panel creates a much smaller project and requires fewer decorative motifs.
Adjust the border to match the reduced dimensions.
Longer Dining Table Runner
Add mesh rows in pairs to increase the length.
Keep the total number of rows odd so the border structure can be adjusted more easily.
Additional red leaves and gold berry clusters can be added to maintain balanced decoration.
Wider Runner
Increase the foundation chain to create additional mesh loops.
A wider runner will require recalculation of the short-edge and scallop counts.
Do not simply add loops without adjusting the border.
More Decorative Christmas Version
Add additional small red leaves and gold berries between the existing motifs.
Keep the heavier decorations distributed evenly so one section does not become noticeably heavier than another.
Minimal Christmas Version
Use fewer red leaves and berry clusters.
Leave more of the green lace visible for a lighter, more elegant appearance.
Frequently Asked Questions
Can I use fabric instead of the crocheted mesh?
Yes. The red leaves, sage leaves, vine, tendrils, and berry clusters can be sewn onto a stable fabric runner.
Choose fabric that can support the weight of the crocheted motifs without stretching excessively.
A tightly woven cotton or linen-style fabric can work well.
Can I use acrylic yarn?
Yes, but cotton is recommended for the main runner.
Cotton generally provides a stable structure and responds well to blocking.
If acrylic is used, test a small sample first because it behaves differently during blocking and may not hold the same crisp shapes.
Can I make the red leaves in different shades?
Absolutely.
Using two or three related reds can create additional depth.
For example, combine:
- Deep burgundy
- Cranberry
- Classic Christmas red
Keep the green foliage consistent so the design remains cohesive.
Can I change the gold berries to red?
Yes.
For a stronger red-and-green Christmas palette, make the berries red as well.
However, keeping the berries gold provides a useful accent color and makes the individual clusters easier to see.
Can I use metallic yarn for the berries?
Yes, if the yarn is compatible with your hook size and comfortable to crochet.
A metallic gold accent can make the berries look especially festive.
Test the yarn first because some metallic fibers can be less flexible than cotton.
Do I need exactly 36 berries?
No.
The pattern uses 36 berries because three berries are attached to each of 12 cluster stems.
You can make fewer clusters for a simpler design or additional clusters for a fuller centerpiece.
Can I make the leaves larger?
Yes.
You can increase the foundation chain and adjust the stitch distribution to create larger leaves.
Keep the proportions consistent so the finished leaves still sit naturally beside the vine.
How should I wash the finished Christmas runner?
Follow the care instructions for your chosen yarn.
For cotton, gentle hand washing or a delicate wash cycle is generally appropriate.
Avoid harsh agitation because the sewn-on motifs may become distorted.
After washing, reshape the runner while damp and allow it to dry flat.
How should I store it after Christmas?
Make sure the runner is completely clean and dry before storage.
Store it flat or loosely rolled rather than tightly folded.
Avoid placing heavy objects directly on top of the raised berries and leaves.
If folding is necessary, use acid-free tissue paper between the folds to help protect the dimensional motifs.
Can I use this as a Christmas gift?
Yes. Because the project is handmade and decorative, it can make a thoughtful Christmas gift for someone who enjoys traditional holiday décor.
For gifting, block the runner carefully and present it folded loosely or rolled.
Christmas Assembly Checklist
Before finishing, check that you have:
- 1 blocked mesh panel
- 1 scalloped border
- 1 main padded vine
- 8 branches
- 6 curled tendrils
- 10 large red leaves
- 12 small red leaves
- 10 sage-green ribbed leaves
- 36 gold berries
- 12 berry cluster stems
Once all components are complete, arrange them on the runner before sewing.
Final Christmas Design
The finished Christmas Evergreen Vine Crochet Leaf Table Runner combines an open forest-green lace foundation with dimensional red leaves, sage foliage, curling vines, and golden berry clusters.
The result is a festive botanical centerpiece that works particularly well for Christmas dinners, holiday gatherings, winter celebrations, and seasonal table décor.
Finished size: approximately 42 × 105 cm
Skill level: Advanced
Estimated time: approximately 30–40 hours
Finished Color Scheme
Forest green + Christmas red + sage green + warm gold
This four-color combination gives the runner a traditional Christmas character while allowing the lacework and raised crochet details to remain the focus.
This is the longer Christmas edition, with the cream sections changed to red and the instructions expanded for the full holiday presentation.