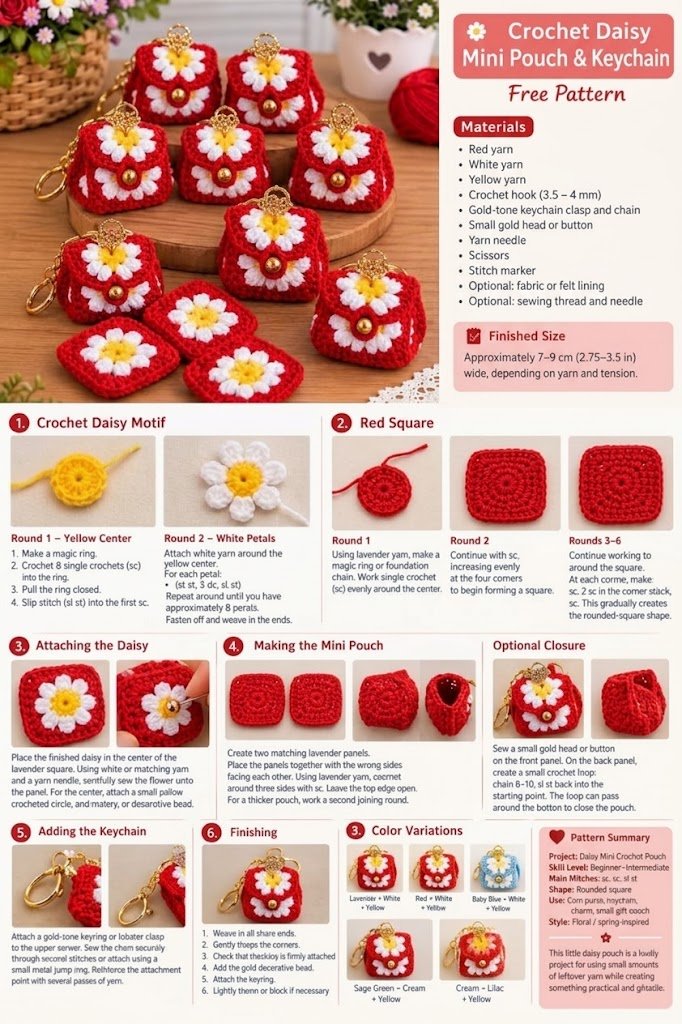
Looking for a quick, adorable crochet project? Learn how to make a crochet red daisy mini pouch with this beginner-friendly step-by-step pattern. Featuring a vibrant red background paired with classic white petals and a sunny yellow center, this cute floral coin purse is ideal for keychains, bag charms, gifts, or quick stash-busting projects!
Pattern Overview
- Skill Level: Beginner to Intermediate
- Main Stitches: Single Crochet (sc), Double Crochet (dc), Slip Stitch (sl st)
- Shape: Rounded Square Pouch
- Uses: Coin purse, keychain charm, lip balm holder, small gift bag
- Style: Bold Floral / Spring-Inspired
Note: Yarn weight and tension vary, so adjust hook size or round counts slightly as needed.
Materials Needed
- Red yarn (chunky, plush, or worsted weight)
- White yarn
- Yellow yarn
- Crochet hook: 3.5 mm – 4.0 mm (or size suitable for yarn)
- Gold-tone keychain clasp and chain
- Small gold bead or button (for closure)
- Yarn needle and scissors
- Stitch marker
- Optional: Fabric/felt lining, matching sewing thread
Finished Size
Approximately 7–9 cm (2.75–3.5 inches) wide, depending on yarn weight and tension.
Step-By-Step Crochet Daisy Pouch Instructions
1. Crochet the Daisy Motif
Round 1: Yellow Center
- With yellow yarn, create a magic ring.
- Work 8 single crochets (sc) into the ring.
- Pull the tail tight to close the ring.
- Join with a slip stitch (sl st) into the first sc. Fasten off.
Round 2: White Petals
- Join white yarn into any stitch of the yellow center.
- Petal Repeat: In the next stitch, work
(sl st, 3 dc, sl st). - Repeat around until you have 8 white petals.
- Fasten off and weave in loose ends.
2. Crochet the Main Red Square Panels (Make 2)
Round 1
- Using red yarn, create a magic ring or foundation chain.
- Work single crochet stitches evenly around the center.
Round 2
- Continue in sc, increasing evenly at the 4 corners to begin forming a square shape.
Rounds 3–6
- Continue working single crochet around the square.
- At each corner, work:
sc, 2 sc in corner stitch, sc. - This creates a soft, rounded-square shape. Keep stitches firm and even so the pouch stays structured.
- Fasten off. Repeat steps to create a second matching red panel.
3. Assemble the Floral Motif
- Place the finished white-and-yellow daisy in the center of one red panel.
- Using white or red yarn with a yarn needle, securely sew the flower onto the panel.
- Optional: Attach a small yellow crocheted circle, embroidery accent, or decorative bead to the center.
4. Join and Construct the Mini Pouch
- Place the two red panels together with wrong sides facing each other.
- Using red yarn, single crochet (sc) around three sides to join them (sides and bottom).
- Leave the top edge open.
- Optional: Work a second joining round for extra durability.
5. Add the Closure (Optional)
- Front Panel: Sew a small gold bead or decorative button to the center top.
- Back Panel: Create a crochet button loop by chaining 8–10 stitches, then slip stitching back into the starting point.
- Secure loose ends; the loop wraps over the button to close the pouch.
6. Attach Keychain Hardware & Finishing Touches
- Attach a gold-tone keyring or lobster clasp to an upper corner of the pouch.
- Secure the chain through multiple stitches or use a small metal jump ring.
- Weave in all remaining yarn ends using your yarn needle.
- Gently shape the corners and check that all elements are secure.
- Lightly steam or block the completed piece if desired.
Popular Color Variations
Swap out the main body color to create an entire collection of colorful mini pouches:
- Red + White + Yellow (Bold & Bright)
- Pink + White + Yellow (Soft Floral)
- Baby Blue + White + Yellow (Pastel Sky)
- Sage Green + Cream + Yellow (Earthy Vintage)
- Cream + Lilac + Yellow (Classic Cottagecore)