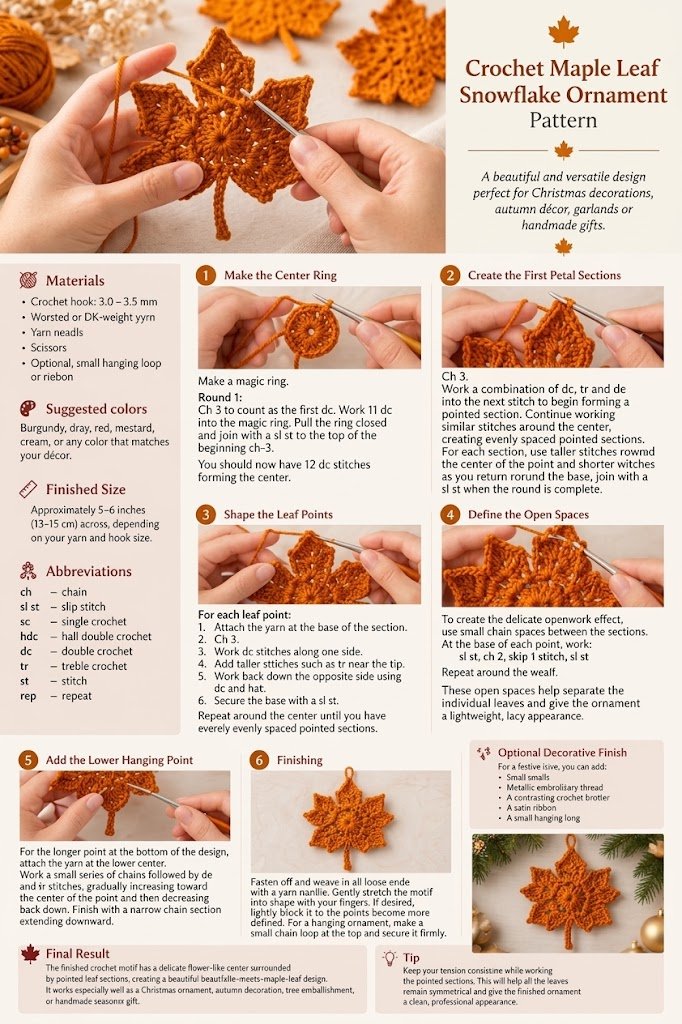
Brighten your seasonal decor with this striking Orange Crochet Maple Leaf Snowflake Ornament. Combining the warm, fiery tone of autumn foliage with the intricate geometry of a winter snowflake, this handmade crochet motif makes a stunning addition to autumn mantel displays, Thanksgiving tables, Christmas trees, or seasonal garlands.
This comprehensive, step-by-step tutorial covers everything you need to craft a crisp, symmetrical, and durable ornament.
Pattern Overview & Details
- Skill Level: Intermediate / Ambitious Beginner
- Finished Size: Approximately 5–6 inches (13–15 cm) in diameter (varies slightly based on yarn weight and tension)
- Primary Color: Vibrant Orange (Pumpkin, Burnt Orange, or Terracotta)
- Design Features: A textured circular center radiating into 6 pointed leaf petals with an elongated lower accent point.
Materials & Tools
- Yarn: Worsted weight (Category 4) or DK weight (Category 3) in Orange (Pumpkin, Burnt Orange, or Vibrant Tangerine)
- Crochet Hook: Size 3.0 mm to 3.5 mm (use a slightly smaller hook than usual for tight, structured stitches)
- Tapestry Needle: For weaving in loose ends
- Scissors: Sharp yarn scissors
- Optional Blocking Tools: Blocking mat, rust-proof pins, and fabric stiffener or spray water bottle
- Hanging Loop: Cream ribbon, jute twine, or a matching orange yarn chain
- Accent Palette Options: Pair your main orange motif with secondary accents in mustard, cream, rust, or deep burgundy.
Abbreviations (US Terms)
- ch: chain
- sl st: slip stitch
- sc: single crochet
- hdc: half double crochet
- dc: double crochet
- tr: treble crochet
- st(s): stitch(es)
- rep: repeat
Step-by-Step Crochet Instructions
Step 1: The Circular Center Ring
This circular foundation holds the core of the motif, setting up the base for all surrounding points.
- Start: Form a magic ring (adjustable loop) using your orange yarn.
- Round 1: Chain 3 (counts as your first double crochet). Work 11 double crochets directly into the magic ring.
- Close: Pull the yarn tail tightly to close the central hole completely. Join with a slip stitch into the top of your initial chain-3.
- Total Count: 12 double crochets.
Step 2: Building the Radial Petal Foundations
This round creates the initial graduated height peaks that will form the surrounding leaf structure.
- Chain 3 (counts as first dc).
- In the next stitch, work the sequence: 1 dc, 1 tr, 1 dc. This creates your first central point foundation.
- Continue working around the ring: position taller stitches (treble crochets) at the peaks and shorter stitches near the valleys between sections.
- Maintain an even distribution of these graduated stitch groups across all 12 center stitches.
- Finish the round by joining with a slip stitch to the top of the opening chain-3.
Step 3: Shaping and Defining the Outer Leaf Points
Build out the outer pointed edges that give the ornament its distinct snowflake-leaf silhouette.
Work across each individual petal section with symmetrical stitch heights:
- Attach Yarn: Join your orange yarn at the base of a section using a slip stitch.
- Ascend: Chain 3, then work double crochets along the ascending side of the leaf segment.
- Form Peak: Work taller stitches (1 or 2 treble crochets) into the tip to create a sharp, defined peak.
- Descend: Work back down the opposite side of the segment using decreasing stitch heights (dc, then hdc).
- Anchor: Fasten the base of the point with a slip stitch into the foundation row.
- Repeat: Continue around until every outer point is fully formed and radiating evenly from the center.
Step 4: Adding Lacing and Openwork Details
Delicate chain spaces between sections give the ornament a light, lacy appearance.
- Locate the valley between two adjacent points.
- Work: 1 slip stitch, chain 2, skip 1 stitch, 1 slip stitch directly into the gap between points.
- Repeat this openwork sequence completely around the motif.
Step 5: Constructing the Elongated Lower Point
Add the signature downward-facing extension at the base to finalize the classic maple leaf profile.
- Locate Base: Identify the bottom-most center point between the lower leaf lobes. Attach orange yarn at this stitch.
- Foundation Chain: Chain 3 to establish the working height.
- Graduated Stitches: Work double crochets increasing to treble crochets toward the point’s center, then decrease back down using double crochets and half double crochets.
- Tip Extension: Chain 3 to 4 stitches at the bottom peak to create a narrow downward extension.
- Secure with a slip stitch back into the main body.
Step 6: Finishing & Wet Blocking
- Fasten Off: Cut yarn leaving a 4-inch tail and pull it through the final loop.
- Weave Ends: Use a tapestry needle to securely weave all yarn tails through the back of the stitches.
- Block into Shape:
- Lay the orange motif flat on a blocking board. Pin out each individual leaf tip outward to create crisp symmetry.
- Lightly spray with water or a starch/fabric stiffening mixture.
- Allow to dry completely before unpinning.
- Add Hanger: Attach a length of twine, satin ribbon, or an orange yarn loop through the top point for hanging.
Styling & Crafting Ideas
- Fall Garland: Make 5 to 8 orange motifs, pair them with cream and mustard leaves, and string them onto a rustic jute rope.
- Sparkle Finish: Carry a thin strand of metallic gold thread alongside your orange yarn for a subtle festive sparkle.
- Gift Topper: Tie a blocked orange leaf motif onto wrapped holiday gifts as a reusable, handmade keepsake.
Pro Tip for Clean Results
Because orange yarn highlights stitch definition, keep your tension even throughout the treble crochet rounds. If your leaf tips curl forward, a quick wet-blocking session with pins will flatten them out permanently.