Welcome, fellow crochet enthusiasts! Are you looking for the perfect blend of protection, style, and handmade charm for your iPhone 18 Pro Max? This detailed crochet tutorial will guide you through creating a beautiful and functional phone case decorated with delicate daisy motifs.
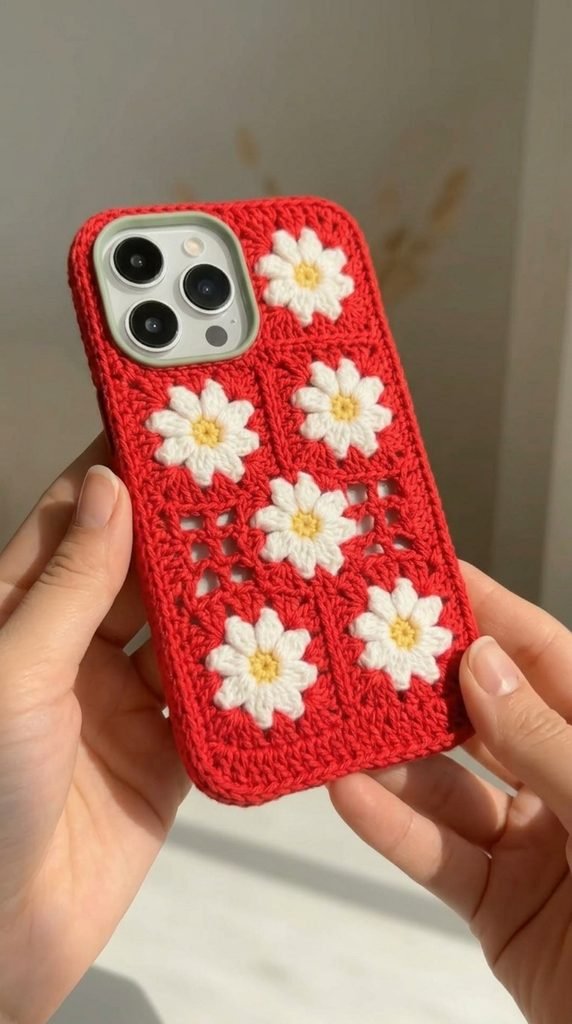
For this version, the main crochet case color is changed from muted sage green to a rich red, while the flower colors remain exactly the same: snow-white petals and pale-yellow centers. The striking red background creates a beautiful contrast with the soft white daisies and sunny yellow centers.
This handmade case is not only practical but also makes a thoughtful personalized gift. The textured crochet fabric provides a comfortable grip, while the floral decoration gives the phone a unique handmade appearance that mass-produced cases simply cannot replicate.
Crochet iPhone 18 Pro Max Case with Red Floral Design
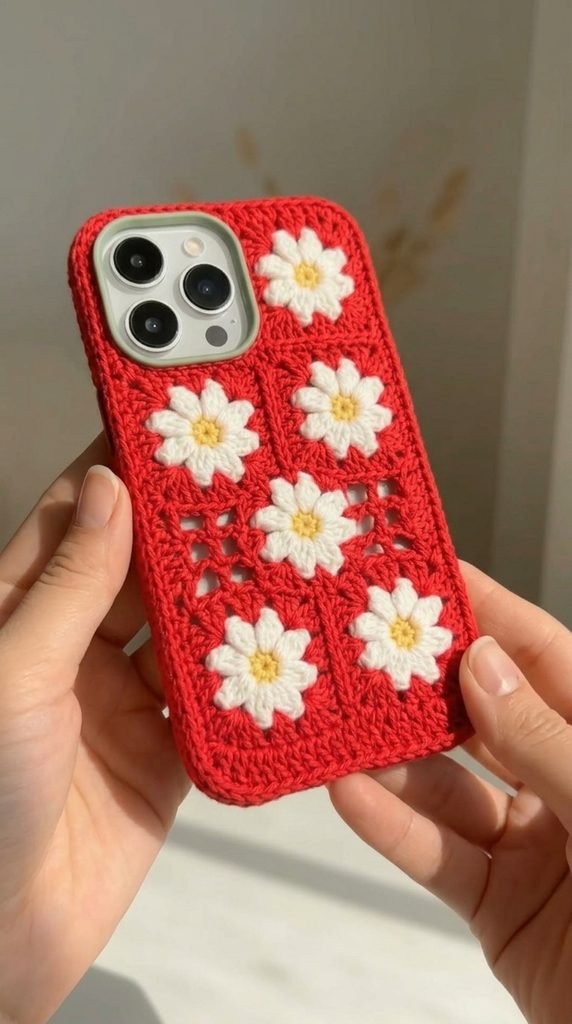
The main structure of the case is crocheted in a rich red worsted-weight yarn, creating a bold and vibrant background. Adorning the back panel are nine charming daisy appliqués, each featuring crisp snow-white petals surrounding a pale-yellow center.
The camera area includes a specially shaped opening so the camera module remains accessible. The finished case is soft yet sturdy, especially when made with worsted-weight cotton yarn.
The combination of red, white, and pale yellow gives the finished case a cheerful floral appearance while maintaining the original construction and design.
This project is also an excellent way to practice:
- Single crochet
- Double crochet
- Chain stitches
- Mesh crochet
- Simple shaping
- Floral appliqués
- Joining crochet pieces
- Sewing and finishing
Pattern Information
Skill Level: Easy-Intermediate
This pattern uses basic stitches such as single crochet and double crochet, combined with simple shaping for the camera opening and final assembly.
Finished Size: Approximately 8 cm (3.15 inches) wide × 17–18 cm (6.7–7.1 inches) tall.
Gauge: Not critical, but for consistent sizing, aim for approximately 4 sc per inch using the recommended yarn and hook.
Color Palette
Main Case: Rich Red
Daisy Petals: Snow White
Daisy Centers: Pale Yellow
Important: Only the main case color has been changed. The flowers remain snow white with pale-yellow centers throughout the entire pattern.
Crochet Abbreviations
- sc = single crochet
- dc = double crochet
- ch = chain
- sl st = slip stitch
- st(s) = stitch(es)
- rnd = round
- rep = repeat
Materials
Yarn
Use Medium Weight / Worsted Category 4 cotton or acrylic yarn.
Cotton is highly recommended because it provides good structure, durability, stitch definition, and a comfortable grip.
Rich Red Yarn
Approximately 100 g / 200 yards for the main case.
The red yarn is used for:
- Front panel
- Back panel
- Camera-cutout section
- Four side strips
- Main assembly
Snow White Yarn
Approximately 10 g for the daisy petals.
Keep this color unchanged.
Pale Yellow Yarn
Approximately 5 g for the daisy centers.
Keep this color unchanged.
The final color combination is therefore:
Rich Red + Snow White + Pale Yellow
Crochet Hook
Use a 4.0–4.5 mm crochet hook, approximately G-6 or H-8 US size.
Notions
- Tapestry needle for weaving in ends and sewing motifs
- Scissors
- Stitch markers, optional but helpful for panel alignment
- Measuring tape, recommended for checking dimensions
Pattern Overview
This crochet iPhone 18 Pro Max case is constructed in several sections before being assembled into the final product.
First, you will create nine daisy flower motifs. Each daisy has a pale-yellow center surrounded by snow-white petals.
Next, you will create the front and back panels using rich red yarn and a mesh/granny-style stitch pattern.
The back panel includes a specially shaped camera opening. This is created by temporarily separating the work into two sections and then reconnecting them with a chain bridge.
The front panel is worked without a camera opening and is slightly shorter to provide a snug fit.
After completing the main panels, you will crochet four narrow red side strips. These strips connect the front and back panels and give the finished case its depth and structure.
Finally, the nine white-and-yellow daisies are arranged in a 3×3 grid on the red back panel and securely sewn into place.
Step 1: Crochet the Daisy Flower Motifs
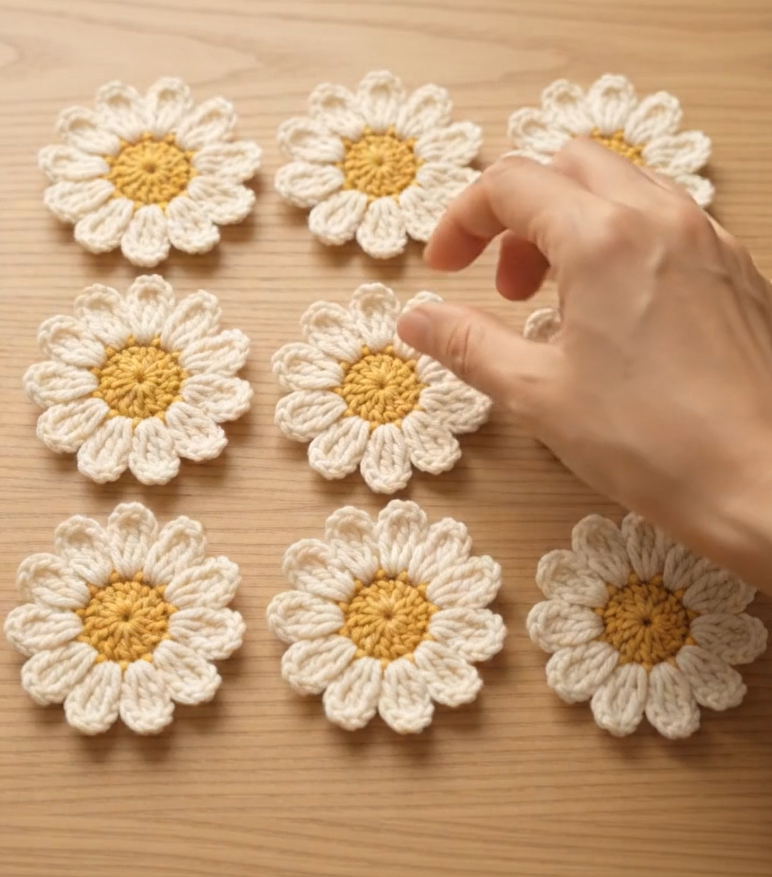
Make 9 flowers.
Each flower uses two colors:
- Pale Yellow: center
- Snow White: petals
The flower colors remain unchanged from the original design.
Round 1 — Pale Yellow Center
Using Pale Yellow yarn:
- Chain 4.
- Insert the hook into the first chain.
- Slip stitch to form a small ring.
- Make sure the ring is secure.
- Fasten off if desired, leaving a yarn tail for later assembly.
This creates the small pale-yellow center of the daisy.
Round 2 — Snow White Petal Base
Join Snow White yarn to the pale-yellow ring.
- Chain 1.
- Work 8 single crochet stitches into the ring.
- Slip stitch into the first single crochet to join.
You should have:
8 sc
This round creates the foundation for the eight flower petals.
Round 3 — Snow White Petals
Continue using Snow White yarn.
Work the following sequence:
Chain 2, 1 dc, chain 1, 1 dc into the same stitch, skip 1 sc, slip stitch into the next sc.
Repeat this sequence around the flower.
Continue until you have created 8 petals.
Fasten off, leaving a long enough yarn tail to attach the flower to the case.
Repeat these instructions until you have 9 matching daisies.
Arrange the completed flowers in a group and set them aside while you crochet the red case panels.
Step 2: Crochet the Main Panels
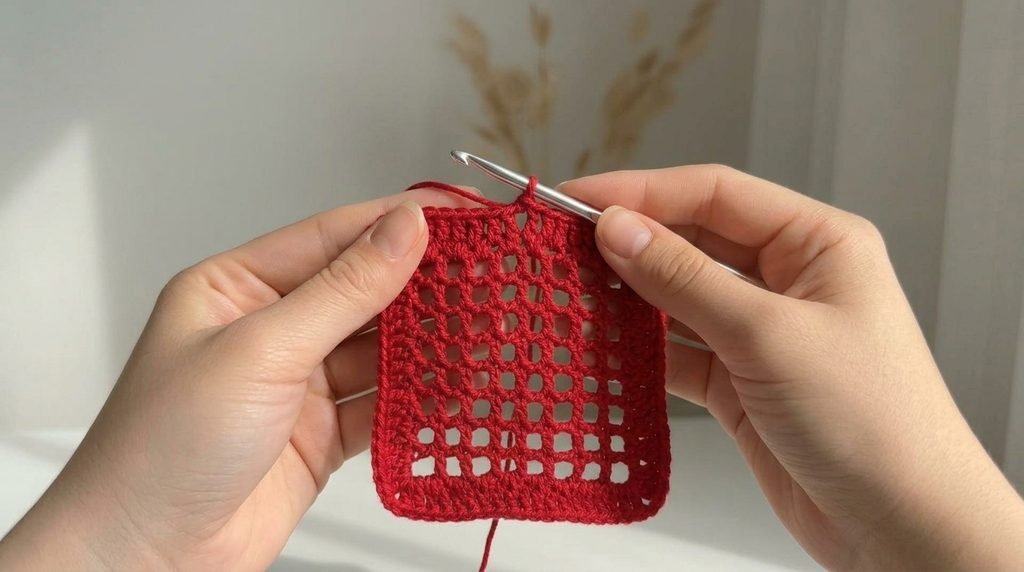
The front and back panels are worked using Rich Red yarn.
The panels use a simple mesh/granny-style stitch pattern that gives the case a textured, lightweight appearance.
Foundation Chain
Using Rich Red yarn:
Chain 34.
This should create a starting width of approximately 8 cm, depending on your yarn tension.
Row 1
- Single crochet into the second chain from the hook.
- Continue working single crochet across the foundation chain.
- Turn.
You should have:
33 sc
Row 2
- Chain 2. This counts as the first double crochet.
- Work 1 dc into the same stitch.
- Skip 1 stitch.
- Work 1 dc into the next stitch.
- Chain 1.
- Repeat the sequence across the row.
- Turn.
This begins creating the mesh-style texture.
Rows 3–24
Continue repeating the mesh pattern established in Row 2.
Work until the piece measures approximately:
15 cm in length.
Because crochet tension varies between crocheters, use the measurement as your primary guide rather than relying only on the row number.
Back Panel — Camera Cutout
The back panel is worked in Rich Red yarn and includes a specially shaped camera opening.
Rows 25–28 — Camera Cutout Section
Work the mesh pattern across the first 10 stitches.
Turn.
Continue working these 10 stitches for four rows.
Cut the yarn and fasten off.
Rejoin the Rich Red yarn to the 11th stitch from the opposite end of the previous full row.
Work the mesh pattern across the remaining 10 stitches.
Turn.
Continue working these 10 stitches for four rows.
You now have two separate red sections with a gap between them.
This gap creates the foundation for the camera opening.
Important Camera Fit Check
Before continuing, carefully check the camera opening against the actual phone or an accurate phone template.
Check:
- Camera position
- Camera opening width
- Camera opening height
- Distance from the top edge
- Overall panel width
Adjust the opening if necessary.
The camera area should remain completely unobstructed when the finished case is placed on the phone.
Row 29 — Bridge the Camera Opening
Rejoin Rich Red yarn at the edge of the first section.
- Chain 2.
- Work the mesh pattern across the first 10 stitches.
- Chain approximately 10 stitches across the camera opening.
- Continue the mesh pattern across the second section.
- Turn.
The chain stitches create a bridge across the camera opening.
Rows 30–32 — Top Edge
Continue the mesh pattern across the entire row.
Work into the chain stitches created over the camera opening.
Continue until the completed back panel measures approximately:
17–18 cm
in total length.
Front Panel
The front panel does not contain a camera opening.
Using Rich Red yarn, repeat the same construction.
Complete Rows 1–24.
Then continue the mesh pattern for approximately 3–4 additional rows, or until the front panel measures approximately:
16–17 cm
The front panel should remain slightly shorter than the back panel to help create a comfortable fit.
Step 3: Crochet the Side Strips
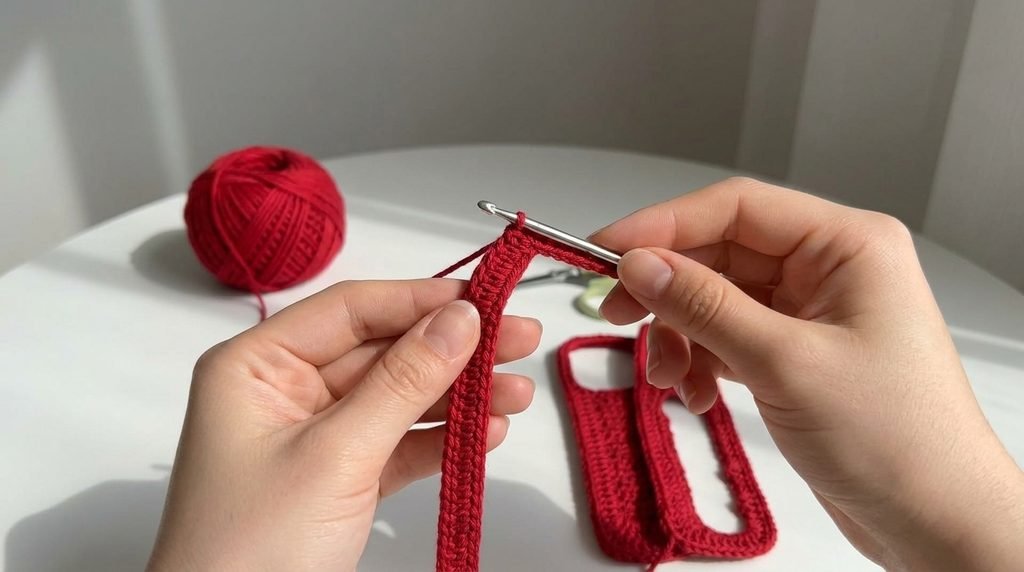
Make 4 side strips.
Use Rich Red yarn throughout.
These strips create the sides and depth of the phone case.
Foundation Chain
Chain 4.
Row 1
- Single crochet into the second chain from the hook.
- Single crochet across.
- Turn.
You should have:
3 sc
Rows 2–28
Repeat Row 1 until the strip measures approximately:
17–18 cm
in length.
Fasten off.
Repeat the instructions until you have four matching red side strips.
Step 4: Assemble the Main Case
Place the front and back panels together with their wrong sides facing inward.
Make sure the edges are aligned carefully.
Position the four red side strips along the corresponding edges.
Using either single crochet or slip stitch, join the strips to the front and back panels.
Work carefully through the appropriate layers so the seams remain even and secure.
Leave the Required Openings
When assembling the case:
- Leave approximately 1 cm open where needed for the charging port.
- Leave the appropriate opening near the top for the speaker.
- Keep the camera opening completely unobstructed.
- Make sure the phone’s buttons remain accessible.
- Check that no seam interferes with the phone’s functional areas.
Work slowly around the case and check the alignment frequently.
The entire main case should now be rich red.
Step 5: Attach the Daisy Motifs
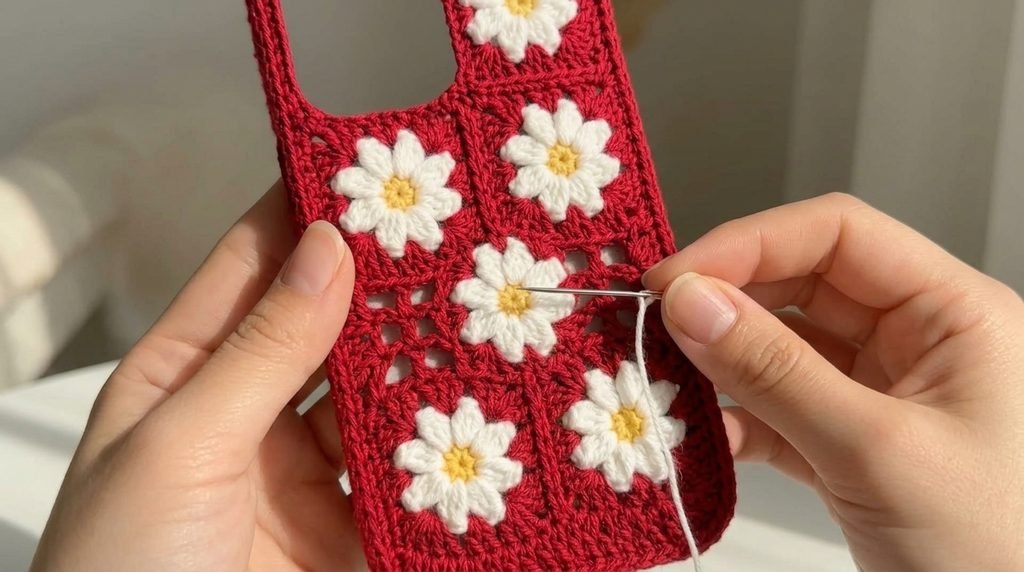
Now it is time to add the floral decoration.
The finished case should have:
- Rich Red main body
- Snow White daisy petals
- Pale Yellow flower centers
Arrange the nine daisies on the red back panel in a classic:
3 × 3 grid
Before sewing them down, place all nine flowers on the case.
Adjust their spacing until the arrangement looks balanced.
Make sure the flowers do not overlap the camera opening.
Sewing the Flowers
For each flower:
- Thread the leftover yarn tail onto a tapestry needle.
- Position the flower carefully on the red mesh.
- Stitch around the flower center and/or petals.
- Secure the flower firmly to the red crochet fabric.
- Keep the stitches neat and concealed where possible.
- Weave the remaining yarn tail into the inside of the case.
- Trim the excess yarn.
Repeat until all nine white-and-yellow daisies are securely attached.
The contrast between the red crochet background and the white petals should create a bold floral appearance.
Step 6: Finishing the Case
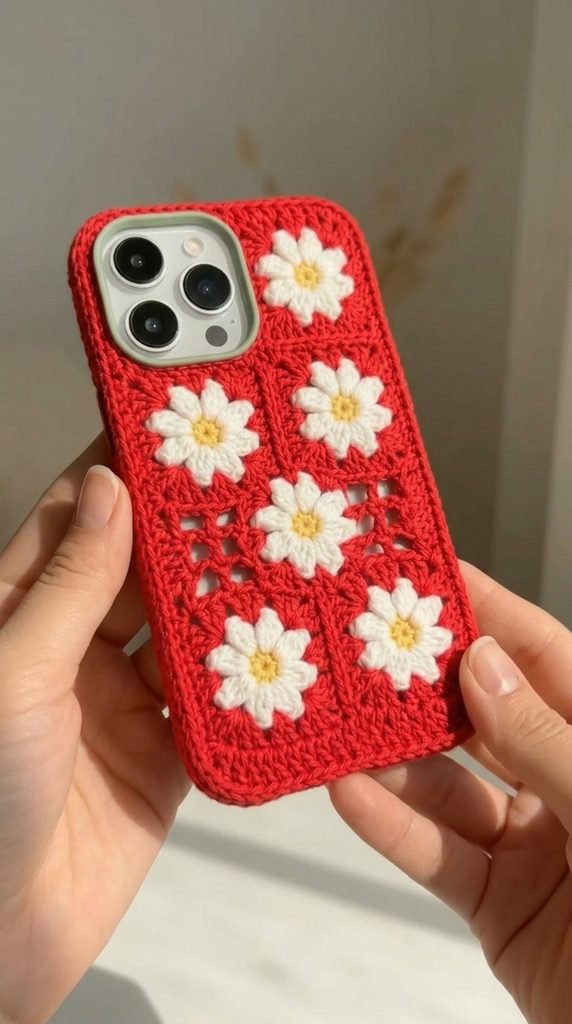
Your crochet case is almost finished.
Carefully inspect the entire project.
Check all seams and make sure there are no loose sections.
Finishing Checklist
- Weave in all remaining red yarn ends.
- Secure the white flower ends.
- Secure the pale-yellow flower ends.
- Trim excess yarn.
- Check the side seams.
- Check the camera opening.
- Check the charging-port opening.
- Check the speaker opening.
- Make sure all nine flowers are securely attached.
- Compare the finished case with the phone before final use.
For the cleanest finish, weave loose ends through several stitches on the inside of the case before trimming them.
Congratulations!
Your Rich Red Crochet iPhone 18 Pro Max Case with White Daisies and Pale-Yellow Centers is now complete!
The rich red background creates a bold and eye-catching foundation, while the crisp snow-white petals and cheerful pale-yellow centers add a bright floral contrast.
The result is a unique handmade accessory that combines:
Rich Red + Snow White + Pale Yellow
The case is practical enough for everyday use while still feeling decorative and special.
Every stitch adds a personal handmade touch that factory-made phone cases simply cannot reproduce.
Styling and Color Ideas
For this version, the flower colors should remain:
Snow White petals + Pale Yellow centers.
Only the main case color is changed.
You can create several versions by changing the background while keeping the same classic daisy colors.
Red Floral Version
- Rich Red
- Snow White
- Pale Yellow
Deep Red Version
- Burgundy Red
- Snow White
- Pale Yellow
Romantic Version
- Dusty Rose
- Snow White
- Pale Yellow
Classic Version
- Black
- Snow White
- Pale Yellow
Bright Version
- Cherry Red
- Snow White
- Golden Yellow
The construction and flower design remain the same.
Helpful Crochet Tips
Measure as You Work
Crochet tension can vary significantly from person to person.
For this reason, check the measurements regularly rather than depending entirely on the stated row counts.
The most important measurements are the overall width, length, and camera opening.
Check the Camera Opening
The camera opening is one of the most important parts of the case.
Before completing the final assembly, place the back panel against the phone or a reliable template.
Make sure the camera opening is correctly positioned and large enough to avoid covering the camera lenses or flash.
Use Cotton Yarn
Cotton yarn is especially suitable for this project because it offers:
- Good structure
- Durability
- Comfortable grip
- Clear stitch definition
- Less stretch
- A clean handmade appearance
Secure the Flowers
The phone case will be handled frequently, so attach every daisy securely.
Pay special attention to the edges of the white petals.
Keep the Colors Consistent
For this red version, maintain the same color combination throughout the project:
Main Case: Rich Red
Petals: Snow White
Centers: Pale Yellow
Do not change the flower colors.
Personalize the Design
You can customize the finished case while keeping the red-and-daisy theme.
Try:
- Different shades of red
- More or fewer daisies
- Different flower spacing
- Larger floral motifs
- Smaller floral motifs
- Additional red crochet borders
- Personalized initials
- Decorative stitching around the edges
You could also make matching accessories such as a crochet AirPods pouch, card holder, keychain, or small coin purse using the same red, white, and pale-yellow palette.
A Thoughtful Handmade Gift
This crochet phone case makes a wonderful handmade gift for someone who loves crochet, flowers, or personalized accessories.
The rich red background makes it especially eye-catching and easy to spot inside a handbag or backpack.
The white daisies and pale-yellow centers provide a cheerful floral detail while keeping the overall design elegant.
You can also personalize the gift by choosing a different shade of red while keeping the classic white-and-yellow daisies.
Companion Video Tutorial
For crocheters who prefer visual instruction, a companion video can demonstrate every stage of this project.
The video can show:
- Creating the yellow flower centers
- Adding the white daisy petals
- Making all nine flowers
- Starting the red foundation chain
- Creating the mesh stitch
- Crocheting the front panel
- Creating the camera cutout
- Crocheting the four red side strips
- Joining the panels
- Creating the charging-port and speaker openings
- Arranging the nine daisies
- Sewing the flowers onto the red mesh
- Weaving in all loose ends
- Checking the final fit
Seeing the stitches and assembly process in real time can be particularly helpful when working on the camera opening and joining the side strips.
Final Notes
The stitch counts and measurements in this pattern are intended as a general guide.
Crochet tension, yarn thickness, hook size, and the actual dimensions of the phone can affect the finished size.
Always compare your work with the actual phone or an accurate template before completing the final assembly.
The red color is used for the entire main case, while the flowers remain snow white with pale-yellow centers.
Most importantly, enjoy the process. Every stitch, flower, and seam contributes to a one-of-a-kind handmade accessory.
Happy crocheting! ❤️🌼