This unusual crochet pumpkin starts with a shape that looks nothing like a pumpkin: a long, narrow ribbed crochet strip. The strip is worked flat, joined into a tube, gathered at both ends, filled with fiberfill, and then sculpted with six shaping passes to create the characteristic pumpkin sections. The finished centerpiece is designed to be approximately 32–38 cm wide, with a squat silhouette and prominent vertical ribs.
The design is especially satisfying because the transformation is created entirely through physical crochet construction rather than changing the fabric itself. The original dusty-rose mauve ribbing remains visible from the first flat strip through the finished pumpkin. It is an excellent project for crocheters who enjoy sculptural home décor and want to experiment with turning a simple crocheted panel into a three-dimensional form.
Materials / What You Need
- Super bulky or chunky yarn in dusty rose mauve — approximately 300–450 g. The exact amount depends on yarn thickness, tension, and how densely the pumpkin is stuffed.
- Crochet hook appropriate for your yarn, approximately 6–8 mm as a starting point. Choose the hook that produces a firm but flexible fabric.
- Polyester fiberfill — enough to create a firm, rounded body while still allowing the pumpkin to compress during shaping.
- Tapestry needle — preferably blunt-tipped but strong enough to pass through several layers of chunky crochet.
- Strong matching yarn or crochet cord — for gathering the openings and creating the pumpkin grooves.
- Scissors — for cutting yarn.
- Dark-brown natural wooden stem, approximately 7–9 cm long.
- Champagne-gold yarn — for the optional crochet leaf.
- Stitch marker — useful for marking the seam and center points during shaping.
The original construction concept uses a long strip approximately 95–105 cm long and 20–22 cm wide, which is then joined at its short ends to create the body tube.
Project Details
| Detail | Specification |
|---|---|
| Skill level | Intermediate |
| Terminology | US crochet terms |
| Finished width | Approximately 32–38 cm |
| Finished height | Approximately 22–25 cm, excluding stem |
| Strip size | Approximately 95–105 × 20–22 cm |
| Construction | Flat ribbed panel → tube → gathered ends → stuffed body → sculpted pumpkin |
| Main stitch | Half double crochet through the back loop (hdc BLO) |
| Main color | Dusty rose mauve |
| Pumpkin sections | 6 |
| Gauge | Dimension-based; match the finished strip measurements rather than relying on a fixed row count |
Important Sizing Note
Because yarn thickness and crochet tension vary considerably, do not force a specific number of rows to reach the required strip length. Instead, crochet until your fabric measures approximately 20–22 cm wide and continue until the finished strip measures approximately 95–105 cm long.
This makes the pattern much easier to adapt while preserving the intended proportions.
Step-by-Step Instructions
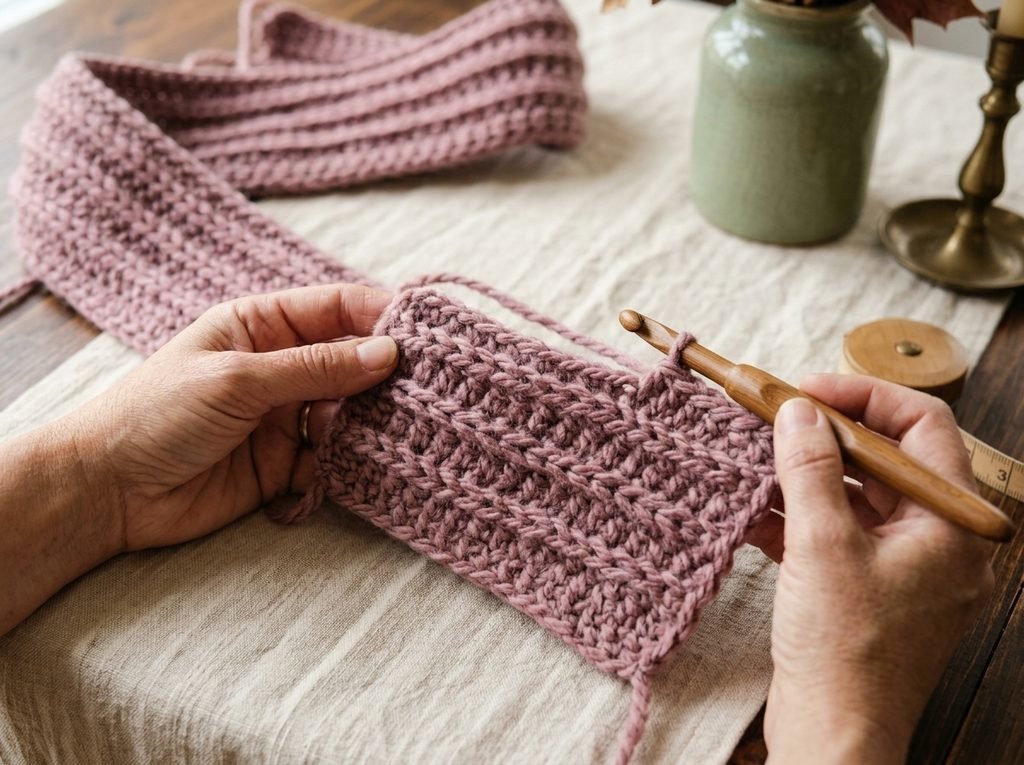
Step 1 — Crochet the Long Ribbed Strip
Start by making a foundation chain long enough to produce a strip approximately 20–22 cm wide.
Work half double crochet (hdc) through the back loop only (BLO) across the row.
For subsequent rows:
Pattern:
Ch 2, turn. Hdc BLO across. Repeat until the strip measures approximately 95–105 cm long.
The chain-2 turning chain does not count as a stitch.
The important feature is the texture rather than a fixed stitch count. Each row should create a raised horizontal ridge across the narrow width of the strip. Keep your tension consistent so the fabric remains flexible enough to gather later.
Measure the strip periodically. Stop when you reach approximately 95–105 cm in length and 20–22 cm in width.
Fasten off, leaving a yarn tail long enough to help with assembly.
Step 2 — Join the Strip Into a Ribbed Tube
Lay the finished strip flat and bring the two short ends together.
Make sure the raised ribs line up as naturally as possible.
Using the tapestry needle and matching dusty-rose yarn, sew the two short ends together. Work through corresponding edge stitches and make several secure passes.
Do not hide the seam completely. A subtle seam is useful because it allows you to identify the original construction of the pumpkin.
When the two short ends are joined, you should have a large open-ended ribbed tube.
The original strip’s long dimension now forms approximately the circumference of the tube, while the original narrow width becomes its height. This preserves the original rib direction around the future pumpkin.
Plain-English check:
Hold the tube upright. You should be able to look through both openings. If the opening is not clearly visible, the strip may have been twisted before joining.
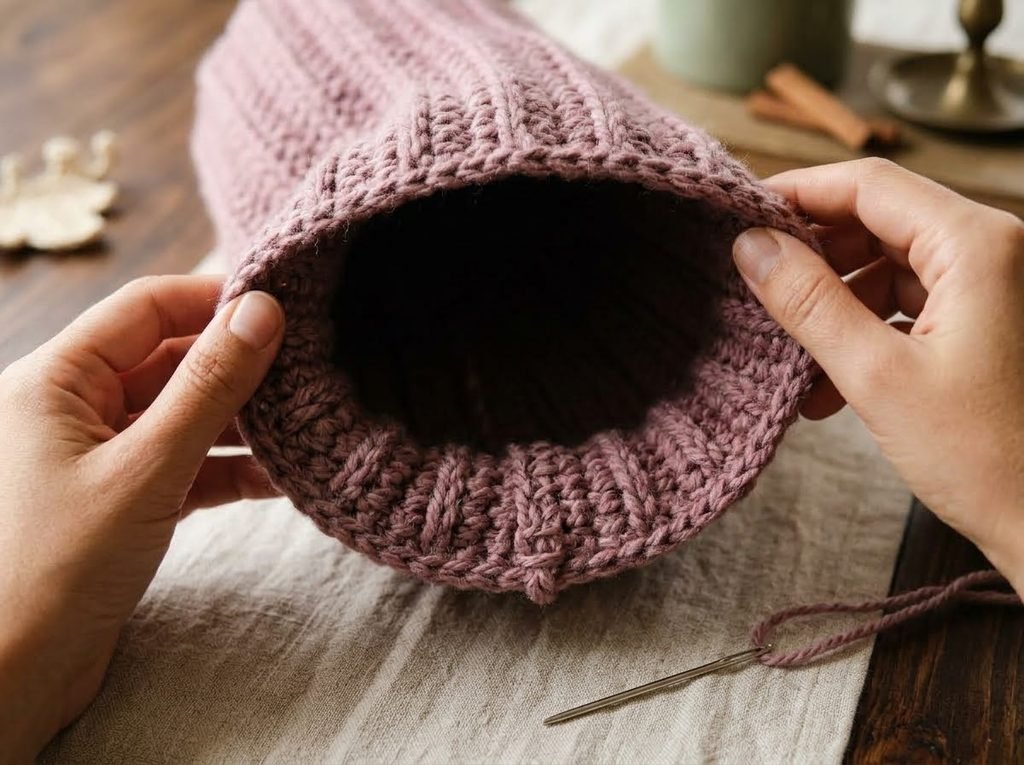
Step 3 — Gather, Stuff, and Close the Body
Choose one open end of the tube.
Thread a long piece of strong matching yarn through the edge stitches around the opening, working evenly around the circumference.
Pull the yarn gradually.
As you tighten it, the opening should contract and the crochet fabric should form natural gathers.
Do not pull so quickly that the stitches distort.
Once the opening is mostly closed, secure the gathering yarn firmly.
Turn the tube upright so the gathered end becomes the bottom.
Now begin adding polyester fiberfill.
Insert the stuffing in small handfuls, working around the inside of the tube rather than creating one large dense lump.
Continue filling until the body becomes rounded and substantial.
Do not completely overstuff it. The fabric needs enough flexibility to compress later when the pumpkin grooves are created.
Leave the second opening accessible.
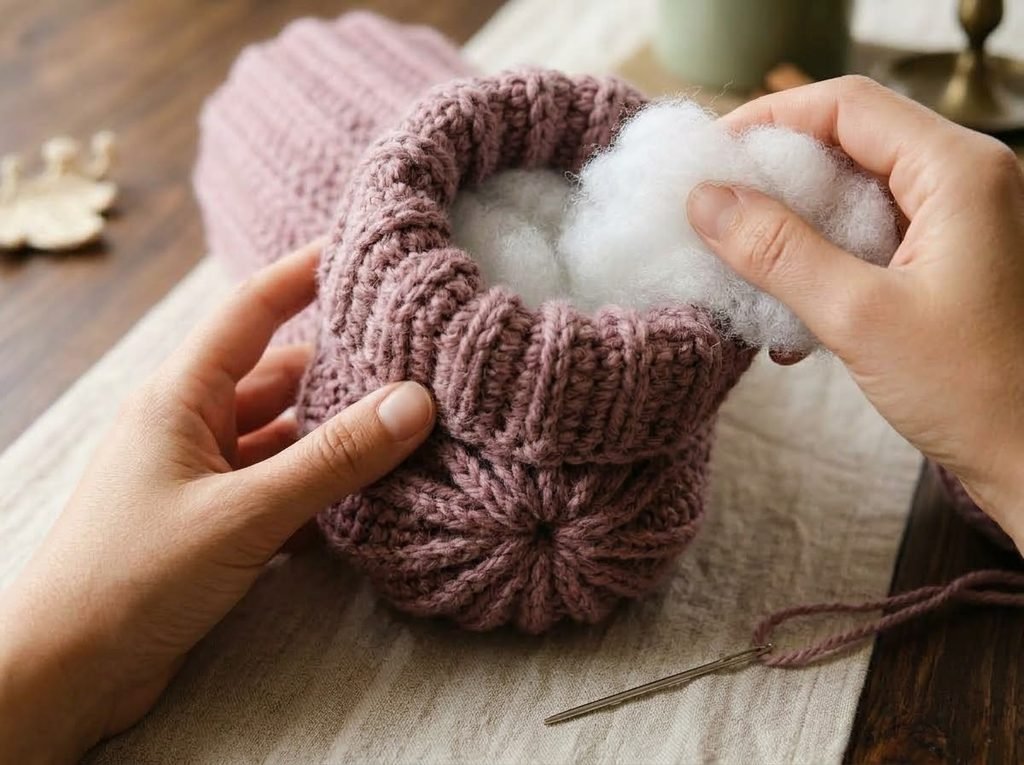
Step 4 — Close the Second End and Sculpt the Pumpkin
Continue adding fiberfill until the body is full but still compressible.
Thread the gathering yarn through the stitches around the remaining opening.
Pull gradually until the opening closes.
Before tightening completely, add a final small amount of fiberfill if you notice any soft or empty areas.
Secure the yarn firmly.
At this point, the project should already look like a large rounded dusty-rose crochet body, but it will still need its pumpkin shaping.
Create the Six Pumpkin Sections
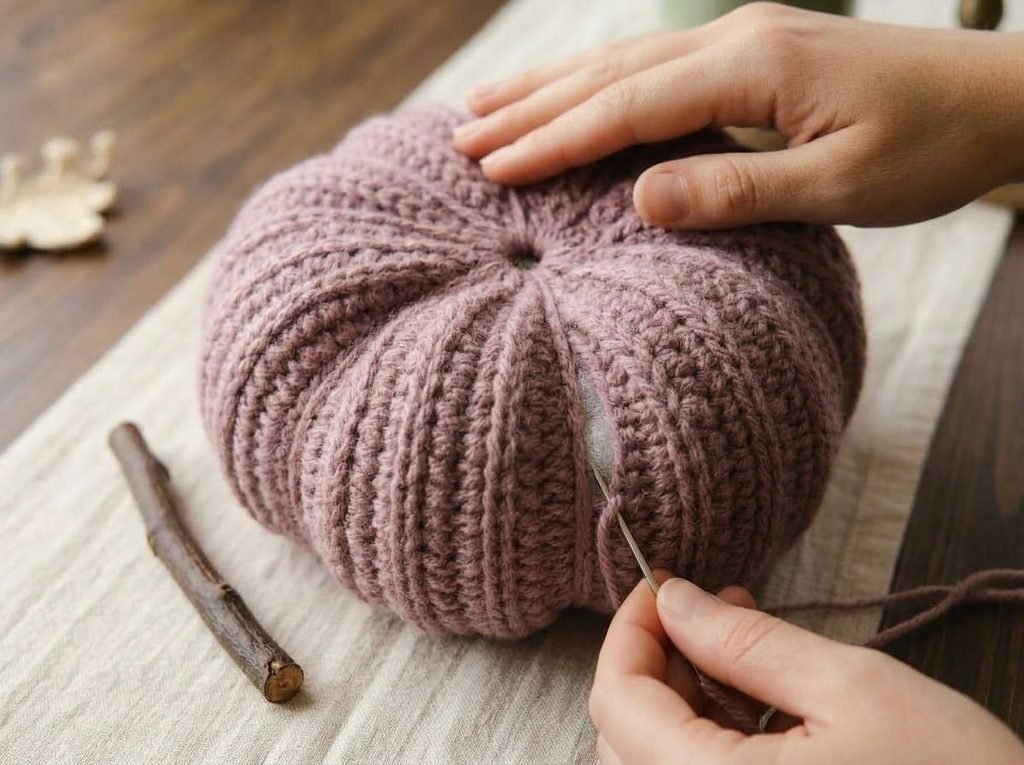
Thread a strong dusty-rose shaping strand onto your tapestry needle.
Insert the needle through the center of the top, push it through the stuffed body, and bring it out through the center of the bottom.
Pull firmly but gradually.
This compresses the stuffing and creates the first deep vertical groove.
Repeat the same process at evenly spaced positions around the pumpkin until you have six broad pumpkin sections.
Each shaping pass should visibly compress the same stuffed body.
Avoid pulling one groove dramatically tighter than the others. Work around the pumpkin gradually, comparing the width of each section as you go.
The original ribbed crochet texture should remain visible inside every section.
Finally, gently press the top and bottom toward each other to create the characteristic squat pumpkin silhouette.
Attach the natural wooden stem at the top.
For an optional decorative finish, add a small champagne-gold crochet leaf beside the stem.
Tips for a Better Result
Keep the Ribbing Consistent
The ribbed texture is one of the most important visual features of this project. Maintain consistent tension throughout the long strip so the ribs have similar height and spacing from one end to the other.
Measure the Strip Instead of Counting Rows
Different chunky yarns can produce very different gauges. For this project, the finished dimensions matter more than reaching a predetermined row count.
Aim for approximately:
- 20–22 cm width
- 95–105 cm length
Do Not Overstuff the Pumpkin
A tightly packed body can become difficult to sculpt. Add fiberfill gradually and squeeze the body occasionally to check that it can still compress.
Make the Six Sections Even
Before making each shaping pass permanent, look at the pumpkin from above. The six sections should be distributed around the circumference rather than clustered on one side.
Pull the Shaping Yarn Gradually
A controlled pull gives you much more control over the depth of each groove. If you pull too aggressively, you can distort the crochet stitches.
Preserve the Handmade Texture
Do not try to smooth every small imperfection. Slight variations in tension make the finished pumpkin look like genuine handmade crochet.
Keep the Stem Proportional
The large pumpkin is approximately 32–38 cm wide, so a stem around 7–9 cm long gives the finished centerpiece a substantial but balanced appearance.
Common Mistakes to Avoid
Problem: The Strip Becomes Twisted When Joined
Why it happens: One short end was rotated before sewing.
How to fix it: Lay both ends flat first and align the ribs before making the first sewing pass. The ridges should follow the intended direction continuously around the tube.
Problem: The Pumpkin Looks Too Cylindrical
Why it happens: The body was not compressed enough during shaping, or the stuffing was distributed too evenly without creating defined sections.
How to fix it: Strengthen the six shaping passes and gently compress the top and bottom. The finished silhouette should be wider than tall rather than cylindrical.
Problem: The Grooves Are Uneven
Why it happens: The shaping passes were placed at irregular intervals or pulled with different amounts of tension.
How to fix it: Mark six approximate shaping positions around the body before beginning. Compare neighboring sections after each pull.
Problem: The Pumpkin Looks Too Round
Why it happens: Too much fiberfill was added or the top and bottom were not compressed sufficiently.
How to fix it: Remove a small amount of stuffing if necessary, then reshape the body by tightening the gathering and vertical shaping strands.
Problem: The Crochet Texture Disappears
Why it happens: The yarn is too loosely crocheted, the stitches are stretched excessively, or the lighting makes the highlights too strong.
How to fix it: Maintain firm but flexible tension and avoid over-pulling the shaping strands. The original ribs should remain visible after sculpting.
Easy Variations
Soft Blush Pumpkin
Use a soft blush yarn instead of dusty rose for a lighter centerpiece while keeping the same construction and proportions.
Sage Green Pumpkin
Replace the main yarn with muted sage green for a natural botanical autumn palette.
Mini Pumpkins
Use the same construction principle with a shorter and narrower strip. Reduce both the strip dimensions and the amount of fiberfill proportionally rather than simply making the original strip tighter.
Neutral Farmhouse Version
Use warm ivory yarn and a natural wooden stem for a softer neutral decoration.
Rich Autumn Version
Use a deep mauve yarn with a darker wooden stem and a muted metallic or earthy leaf for a more dramatic seasonal display.
Textured Yarn Version
A subtly textured chunky yarn can create a different surface appearance, but avoid yarn with extremely long fibers because it can obscure the raised ribbing.
Final Result
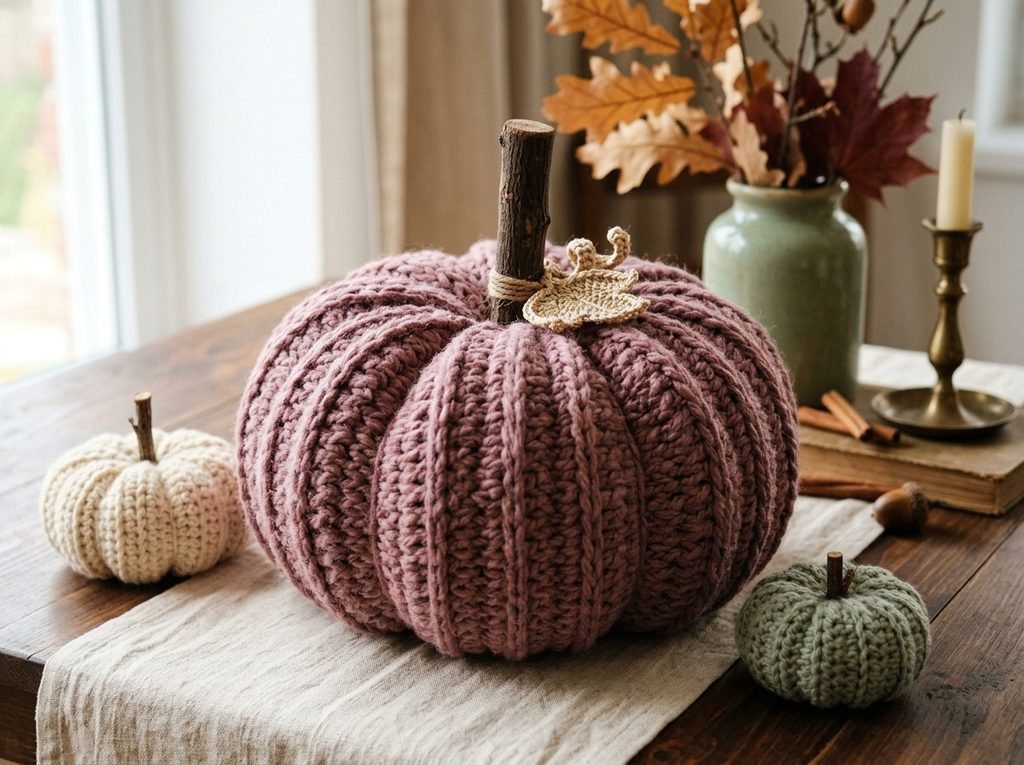
The completed project should be a large, soft, squat crochet pumpkin approximately 32–38 cm wide and 22–25 cm tall excluding the stem. It should have six rounded sections separated by deep sculpted grooves, with the original ribbed crochet texture remaining clearly visible across the entire body.
The dusty-rose mauve color gives the pumpkin a sophisticated autumn appearance, while the natural wooden stem and optional champagne-gold leaf add contrasting finishing details. It works particularly well as a centerpiece on a dining table, console, shelf, mantel, or seasonal craft display.
Frequently Asked Questions
Can I use a different yarn weight?
Yes. The construction can be adapted to other yarn weights, but the final strip dimensions and finished pumpkin size will change. For a similar centerpiece scale, adjust your hook and tension until the strip reaches approximately 20–22 cm wide and 95–105 cm long.
Can I make the pumpkin smaller?
Yes. Make a shorter and narrower strip and reduce the amount of stuffing proportionally. Keep the same basic sequence: flat strip → tube → gather → stuff → gather → sculpt.
Do I have to use dusty rose yarn?
No. Dusty rose is the primary color for this version, but the construction works with ivory, sage, mauve, cream, or other suitable colors.
Why does the rib direction matter?
The strip’s rib direction determines how the texture appears after the strip becomes a tube. When the short ends are joined correctly, the raised ribs continue around the body and become the prominent vertical texture of the finished pumpkin.
How much should I stuff the pumpkin?
Fill it enough to create a substantial rounded body, but leave enough flexibility for the shaping strands to compress the stuffing. If the body feels rock-hard before shaping, it is probably overstuffed.
What should I do if my stitch count does not match someone else’s?
For this project, stitch count is less important than finished dimensions because yarn weight and tension vary. Measure your strip and adjust the number of rows or foundation stitches as necessary to reach the target size.
Conclusion
This crochet pumpkin is a satisfying example of how a simple flat piece of ribbed fabric can become a substantial three-dimensional decoration through joining, gathering, stuffing, and sculpting. The transformation does not require complicated shaping stitches—the character of the finished pumpkin comes from careful proportions, controlled stuffing, and six well-spaced shaping passes.
With its dusty-rose mauve yarn, natural wooden stem, and deep sculpted ribs, the finished pumpkin makes a striking handmade centerpiece while still showing the texture and personality of the original crochet fabric.