By Emily | Published: October 11, 2026 | Categories: Crochet, Christmas Patterns, Home Decor
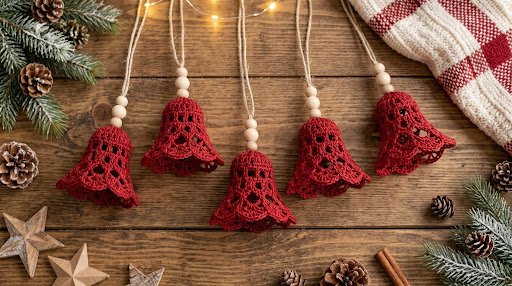
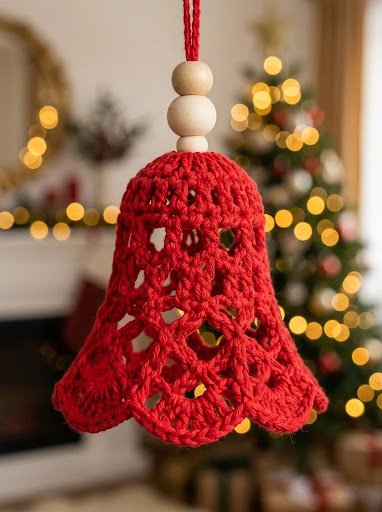
Looking for a charming, vintage-inspired holiday crochet project? These delicate Frosted Crimson Lace Bell Ornaments are designed to catch the light beautifully when hung in a window or on your Christmas tree. Each ornament features a smooth, rounded dome crown, an openwork lace body that gently flares outward, and an elegant scalloped shell border.
Made with smooth festive red cotton yarn, each bell hangs from a rustic gray twine loop accented with a natural wooden bead. Their cozy, Scandinavian holiday aesthetic pairs perfectly with natural wood accents, crisp white decor, and evergreen boughs.
Pattern Overview & Specifications
This pattern is worked top-down in continuous and joined rounds as a single piece. You’ll begin at the crown using a magic ring, work down through eyelet and V-stitch lace rounds, finish with a scalloped border, and then shape and stiffen the bells over a form.
- Skill Level: Intermediate (Lace worked in the round)
- Terminology: Standard US Crochet Terms
- Finished Size (One Bell): 2.75 in (7.0 cm) tall × 3 in (7.6 cm) across the blocked opening
- Size Before Border (Rnd 11): 2.25 in (5.7 cm) tall × 2.75 in (7.0 cm) opening
- Border Depth: 0.5 in (1.3 cm)
- Quantity: Instructions make a set of 5 identical, individually hung bells
Materials & Supplies
Yarn & Cord
- Sport Weight (#2) Cotton Yarn (Festive Red): Approx. 40 g / 135 m (147 yds) total for 5 bells (approx. 6 g / 20 m per bell).
- Yarn Tip: Choose a smooth mercerized or combed cotton yarn for clean stitch definition and optimal stiffening. Avoid fuzzy or stretchy acrylic yarns, as they obscure the delicate lace detail and will not hold the flared bell shape.
- Gray Twine: Approx. 3.7 m (4 yds) total, cut into five 24 in (61.0 cm) lengths.
Tools & Notions
- 2.75 mm (US C/2) Crochet Hook
- 5 Wooden Beads: 12 mm diameter with a hole large enough for doubled twine (~4 mm).
- Tapestry Needle & Scissors
- Stitch Marker
- Fabric Stiffener (or strong commercial starch solution)
- Bell-Shaped Form: A small funnel, shot glass topped with a foil cone, or small balloon.
- Plastic Wrap & Rust-Proof Blocking Pins
- Optional: A drop of clear craft glue for securing twine knots.
Note: Quantities include a ~30% buffer for your gauge swatch and weaving in yarn ends.
Abbreviations & Special Stitches (US Terms)
Abbreviations
- ch – chain
- sl st – slip stitch
- sc – single crochet
- dc – double crochet
- inc – increase (2 sc in same st)
- st(s) – stitch(es)
- sp – space
- sk – skip
- MR – magic ring
- rep – repeat
Special Stitches
- V-stitch (V-st): (dc, ch 1, dc) in indicated stitch or space.
- Shell (Rnd 10): (2 dc, ch 1, 2 dc) in indicated space.
- Shell (Rnd 11): (2 dc, ch 2, 2 dc) in indicated space.
- Fan: 7 dc in indicated space.
Stitch Counting Rule: Every double crochet, single crochet, and chain counts as 1 stitch in stated totals. Any turning chain that “counts as” a stitch is included in the final round count.
Gauge & Checkpoint Guide
Gauge: 6 sc and 6 sc rounds = 1 in (2.5 cm) worked in a flat circle.
Complete one bell fully to check your gauge before making the remaining four:
- After Rnd 4 (Flat Circle): 1.3 in (3.3 cm) diameter.
- After Rnd 7 (Crown): 1.6 in (4.1 cm) wide at the widest point, ~1 in (2.5 cm) tall.
- After Rnd 9: 1.75 in (4.4 cm) total height.
- After Rnd 11: 2.25 in (5.7 cm) total height × 2.75 in (7.0 cm) opening.
- Final Blocked Bell: 2.75 in (7.0 cm) total height × 3 in (7.6 cm) opening.
- If your bell is too large: Switch to a 2.5 mm hook or tighten chain tension.
- If your bell is too small: Switch to a 3.0 mm hook. Do not add extra pattern repeats, as the 10-repeat structure carries through to the border.
Step-by-Step Crochet Instructions
Section 1: Crown (Rnds 1–7)
Work in continuous spiral rounds for Rnds 1–4, moving your stitch marker each round.
- Rnd 1: MR, 6 sc in ring. (6 sts)
- Rnd 2: Inc in each st around. (12 sts)
- Rnd 3: [Sc in next st, inc] 6 times. (18 sts)
- Rnd 4: [Sc in next 2 sts, inc] 6 times. Sl st to first sc. (24 sts)
- Checkpoint: Circle measures 1.3 in (3.3 cm) across.
- Rnd 5 (Eyelet Round): Ch 4 (counts as dc + ch 1), sk next st. *Dc in next st, ch 1, sk next st; rep from * 10 more times. Sl st to 3rd ch of beg ch-4. (12 dc + 12 ch = 24 sts)
- Rnd 6 (Gentle Increase Round): Ch 1. *Sc in next dc, sc in next ch-1 sp, sc in next dc, 2 sc in next ch-1 sp; rep from * 5 more times. Sl st to first sc. (30 sts)
- Rnd 7 (Eyelet Round): Ch 4 (counts as dc + ch 1), sk next st. *Dc in next st, ch 1, sk next st; rep from * 13 more times. Sl st to 3rd ch of beg ch-4. (15 dc + 15 ch = 30 sts)
- Checkpoint: Crown forms a rounded dome, 1.6 in (4.1 cm) across and ~1 in (2.5 cm) tall.
Section 2: Lace Body (Rnds 8–11)
The body follows a consistent 10-repeat structure.
- Rnd 8: Ch 4 (counts as dc + ch 1), dc in same st (first V-st made). *Ch 1, sk next 2 sts, V-st in next st; rep from * 8 more times, ch 1, sk last 2 sts. Sl st to 3rd ch of beg ch-4. (10 V-sts; 20 dc + 20 ch = 40 sts)
- Rnd 9: Sl st into first V-st ch-1 sp. Ch 4 (counts as dc + ch 1), dc in same sp. *Ch 2, V-st in next V-st sp; rep from * 8 more times, ch 2. Sl st to 3rd ch of beg ch-4. (10 repeats × 5 sts = 50 sts)
- Checkpoint: Height measures 1.75 in (4.4 cm).
- Rnd 10: Sl st into first V-st sp. Ch 3 (counts as dc), (dc, ch 1, 2 dc) in same sp. *Ch 2, (2 dc, ch 1, 2 dc) in next V-st sp; rep from * 8 more times, ch 2. Sl st to top of beg ch-3. (10 repeats × 7 sts = 70 sts)
- Rnd 11 (Flare Round): Sl st in next dc and into shell ch-1 sp. Ch 3 (counts as dc), (dc, ch 2, 2 dc) in same sp. *Ch 2, sc in next ch-2 sp, ch 2, (2 dc, ch 2, 2 dc) in next shell ch-1 sp; rep from * 8 more times, ch 2, sc in last ch-2 sp, ch 2. Sl st to top of beg ch-3. (10 repeats × 11 sts = 110 sts)
- Checkpoint: Total height is 2.25 in (5.7 cm); bottom opening measures 2.75 in (7.0 cm) across.
Section 3: Scalloped Border (Rnds 12–13)
- Rnd 12 (Fan Round): Sl st in next dc and into shell ch-2 sp. Ch 3 (counts as dc), 6 dc in same sp (first fan made). *Sc in next sc, Fan (7 dc) in next shell ch-2 sp; rep from * 8 more times, sc in last sc. Sl st to top of beg ch-3. (10 repeats × 8 sts = 80 sts / 10 fans)
- Note: Skip ch-2 loops on either side of scs; fans sit directly over them.
- Rnd 13 (Sc Trim Round): Ch 1. *Sc in next 3 dc, 3 sc in 4th (center) dc of fan, sc in next 3 dc, sl st in next sc; rep from * 9 more times. Sl st to first sc. Fasten off, leaving a 6 in (15.2 cm) tail. (100 sts total)
Hanging Layout & Display Setup
Repeat the complete pattern to make 5 identical Festive Red bells.
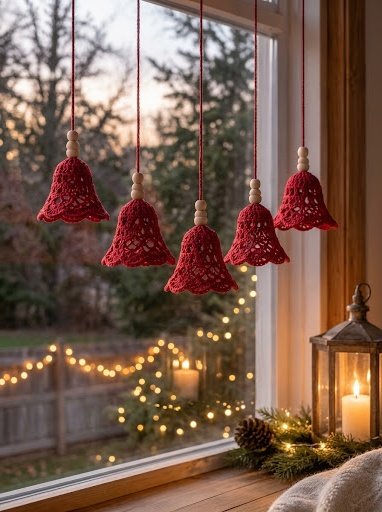
Display Layout (Staggered Window Drop Recommendations)
| Bell | Color | Drop Length (Rod to Top of Bead) |
| Bell 1 | Festive Red | 8.0 in (20.3 cm) |
| Bell 2 | Festive Red | 9.0 in (22.9 cm) |
| Bell 3 | Festive Red | 10.0 in (25.4 cm) |
| Bell 4 | Festive Red | 9.0 in (22.9 cm) |
| Bell 5 | Festive Red | 6.0 in (15.2 cm) |
Note: Bells hang individually on separate cords.
Stiffening, Blocking & Assembly
- Finish Ends: Weave starting tail into the crown on the wrong side, leaving the MR center loose enough for cord passage. Weave the border tail along the sc trim.
- Prepare Form: Wrap plastic wrap tightly around a bell-shaped form (approx. 1.6 in / 4.1 cm top diameter, 3.0 in / 7.6 cm base diameter).
- Saturate: Dip the crochet bell in fabric stiffener or heavy starch solution. Squeeze out excess moisture gently without wringing.
- Shape: Fit the damp bell over the form, centering the crown. Smooth out lace openwork with your fingers.
- Pin: Pin the center peak of each of the 10 scallops so the bottom opening holds a precise 3 in (7.6 cm) diameter.
- Dry: Allow 12–24 hours to dry completely before removing from form.
- Attach Cord & Bead:
- Fold a 24 in (61.0 cm) length of gray twine in half.
- Thread both free ends through a 12 mm wooden bead.
- Pass free ends down through the magic ring opening into the bell interior.
- Tie a large overhand knot inside the bell (apply a drop of glue if desired).
- Trim excess twine and loop onto display rod or tree branch.
Quality Control & Troubleshooting
Quality Checklist
- [ ] Crown is gently domed (not flat or pointed).
- [ ] Rnd 7 has 30 sts; Rnd 8 has exactly 10 V-stitches.
- [ ] Rnd 11 has 110 sts with 10 shells.
- [ ] Border features 10 uniform scallops (100 sts in Rnd 13).
- [ ] Finished bell measures 2.75 in (7.0 cm) tall × 3 in (7.6 cm) wide.
- [ ] Fabric is rigid enough to maintain shape while hanging.
Troubleshooting
- Flat Crown: Ensure you did not add accidental increases in Rnds 5 or 7 (stitch totals must remain 24 and 30 sts).
- Pointed Crown: Work Rnds 1–4 with looser tension or use a 3.0 mm hook for the crown only.
- Premature Flaring: Confirm Rnd 9 uses
ch 1inside each V-st, notch 2. - Ruffled Border: Verify that ch-2 loops were skipped in Rnd 12.
- Soft/Collapsing Shape: Apply a second layer of stiffener solution and let dry fully on the form.
Care Instructions
Dust gently with a soft dry brush. Do not submerge in water, as moisture will dissolve the stiffener. If a bell loses shape, re-saturate with fabric stiffener and re-block over the form.
Related Patterns You Might Like:
- Oat Milk Lace Granny Square Crochet Pattern
- Lavender Blossom Bell Ornament Crochet Pattern