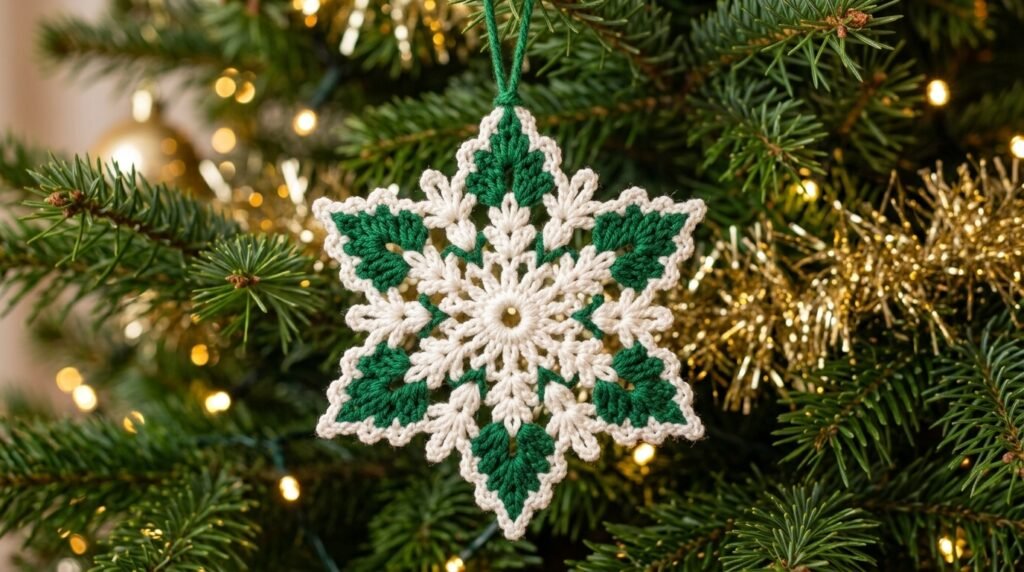
Create a beautiful Peppermint Frost Snowflake Ornament with crisp white crochet and refreshing green accents. This lacy six-pointed snowflake is a lovely handmade decoration for the Christmas tree, holiday gifts, packages, windows, or winter garlands.
The design features a delicate white center, six pointed sections filled with solid green chevron wedges, small white fans between the points, and a neat white picot edging around the entire snowflake. Once starched and blocked, the ornament holds a beautifully crisp six-point shape.
This crochet snowflake is worked as one flat motif using sport-weight mercerized cotton. The pattern uses US crochet terminology and is suitable for an easy-intermediate crocheter who is comfortable working in rounds, changing colors, and following short-row instructions.
The finished snowflake measures approximately 4.5 inches (11.4 cm) from point to point and approximately 3.5 inches (8.9 cm) from valley to valley.
Peppermint Frost Snowflake Ornament Details
The snowflake center is worked in white in the round. After the white center is completed, each of the six green point wedges is worked separately over a point loop. Finally, a white picot edging is worked around the entire outline to connect and finish the snowflake.
After blocking and starching, the finished ornament becomes firm enough to maintain its sharp points.
Finished Size and Construction
- Finished size: 4.5 in (11.4 cm) point to point; 3.5 in (8.9 cm) valley to valley
- Skill level: Easy-intermediate
- Terminology: US crochet terms
- Yarn weight: Sport weight (2), mercerized cotton
- Hook: 3.0 mm (US C/2 or D/3)
- Number of pieces: 1 single motif
- Layout: One six-pointed snowflake
- Size before border: 4.25 in (10.8 cm) point to point
- Border depth: About 0.125 in (0.3 cm) along each edge
- Construction: 4 white rounds, 6 green point wedges with 2 rows each, and 1 white edging round
Materials for the Crochet Snowflake Ornament
Yarn
Choose a smooth, mercerized cotton in sport weight, approximately 130 m per 50 g. Cotton provides crisp stitch definition and responds particularly well to starch-blocking.
Acrylic yarn can also be used, although the finished snowflake points will generally be softer and may not hold their shape as firmly.
- White: 6 g, approximately 16 m
- Green: 3 g, approximately 8 m, plus about 25 cm (9.8 in) extra for the hanging loop
These quantities include approximately a 25% allowance for swatching and weaving in ends.
Tools
- 3.0 mm crochet hook
- Tapestry needle
- Scissors
- Stitch marker
- Rust-proof pins
- Foam blocking mat
- Spray starch or fabric stiffener
- Ruler or tape measure
Crochet Abbreviations — US Terms
- MR – magic ring
- ch – chain
- sl st – slip stitch
- sc – single crochet
- dc – double crochet
- sp – space
- st(s) – stitch(es)
- tch – turning chain
- rnd – round
Special Stitches
V-stitch (V-st):
Work (dc, ch 2, dc) in the same stitch or space.
Fan:
Work 5 dc in the same space.
Picot:
Worked here as (sc, ch 3, sc) in the same stitch or space. This creates a small pointed loop.
Gauge and Measurement Checkpoints
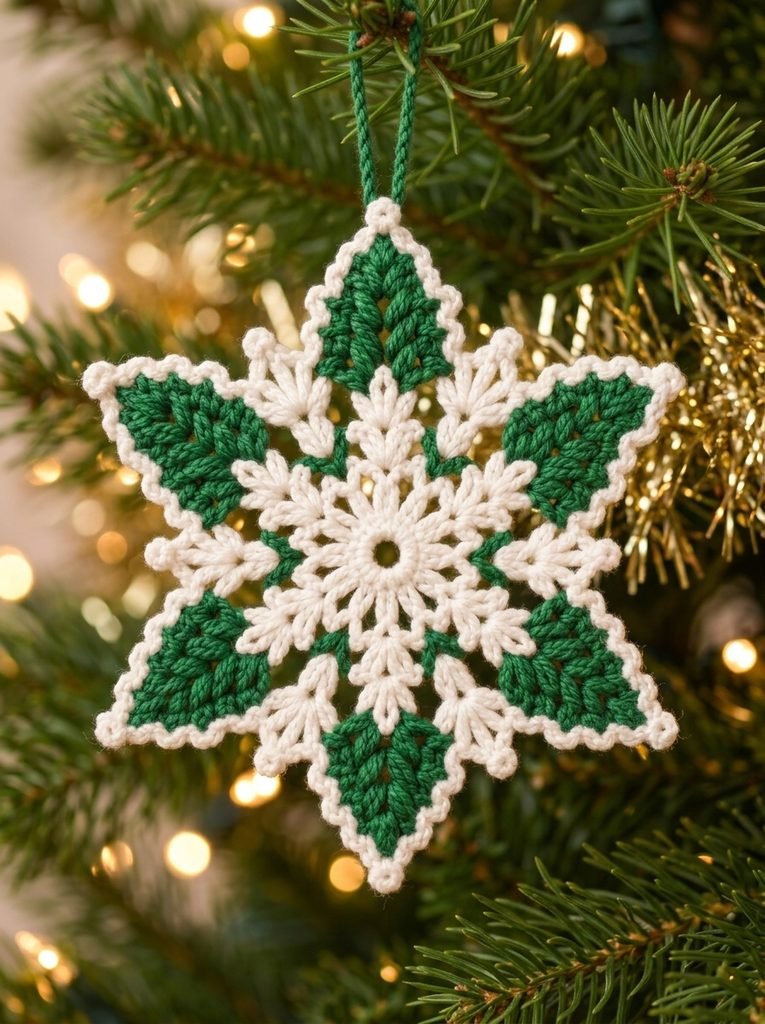
Gauge is not critical for a decorative ornament, but it does affect the final size and the sharpness of the snowflake points.
Crochet the center first and measure it before continuing with the green point wedges.
Base Gauge
Rounds 1–2 should measure approximately:
1.75 in (4.4 cm) across
Checkpoints Before Blocking
- After Round 1: 1 in (2.5 cm) across
- After Round 2: 1.75 in (4.4 cm) across
- After Round 3: 2.25 in (5.7 cm) across
- After Round 4: 2.75 in (7.0 cm), from point loop to opposite point loop
- After green wedges: 4.25 in (10.8 cm) point to point
- After edging: 4.5 in (11.4 cm) point to point
If your center is too large, try a 2.75 mm hook or tighten your chain spaces.
If the center is too small or begins to cup, try a 3.25 mm hook and keep the chain spaces loose.
A center that ruffles generally indicates that the chains are too loose. A center that cups usually means the chains are too tight. Make adjustments at Round 3 because all later rounds depend on these spaces.
Snowflake Center — White
Work the center in white. Do not turn between rounds. Join each round with a slip stitch as indicated.
Round 1
Make a MR.
Ch 3, which counts as the first dc, then work 11 dc into the ring.
Pull the magic ring closed, leaving a small center hole approximately 0.25 in (0.6 cm) wide.
Sl st to the top of the beginning ch-3.
Count: 12 dc.
Round 2
Ch 5, which counts as dc + ch 2.
Dc in the next dc, ch 2.
Repeat from * 10 more times.
Sl st to the 3rd ch of the beginning ch-5.
Count: 12 dc and 12 ch-2 spaces.
These 12 dc create the white spokes surrounding the center hole.
Round 3
Sl st into the first ch-2 space.
Ch 5, which counts as dc + ch 2.
Dc in the same space to create the first V-stitch.
Ch 1.
Work a V-stitch in the next ch-2 space, ch 1.
Repeat from * 10 more times.
Sl st to the 3rd ch of the beginning ch-5.
Count: 12 V-stitches (24 dc) and 12 ch-1 spaces.
The 12 V-stitches now alternate between two functions. Starting with the first V-stitch, identify them as A (point) and B (valley).
You will have:
- 6 A V-stitches
- 6 B V-stitches
Place a stitch marker in the first A V-stitch if helpful.
Round 4
Sl st into the ch-2 space of the first V-stitch, which is an A point.
Ch 1.
In the A ch-2 space, work:
(sc, ch 4, sc)
Ch 2, skip the ch-1 space.
Work a fan of 5 dc in the next B ch-2 space.
Ch 2, skip the next ch-1 space.
Repeat from * 5 more times.
Sl st to the first sc.
Fasten off the white yarn and weave in the ends.
Count:
- 12 sc
- 30 dc
- 6 fans of 5 dc
- 6 ch-4 point loops
- 12 ch-2 spaces
Center Checkpoint
At this stage, the piece should resemble a small hexagon with six ch-4 loops extending outward.
It should lie flat and measure approximately:
2.75 in (7.0 cm) from one ch-4 loop to the opposite loop.
Green Point Wedges — Make 6
Each green wedge is worked in two rows directly over one ch-4 point loop.
The wedge expands outward into a V-shaped chevron with a sharp tip.
For the wedge that will be positioned at the top of the ornament, leave a 25 cm (9.8 in) green yarn tail when fastening off. This tail will be used to make the hanging loop.
Row 1 — Right Side
Join green yarn with a slip stitch in any ch-4 point loop.
Ch 3, which counts as dc.
Work:
(2 dc, ch 2, 3 dc)
in the same loop.
Turn.
Count: 6 dc, 3 on each side of the ch-2 tip.
Row 2 — Wrong Side
Ch 3, which counts as dc.
Dc in the next 2 dc.
In the ch-2 space, work:
(2 dc, ch 2, 2 dc)
Dc in the next 2 dc.
Dc in the top of the turning chain.
Count: 10 dc, 5 on each side of the ch-2 tip.
Fasten off, leaving a 10 cm (3.9 in) tail.
Repeat the same process in each of the remaining five ch-4 loops.
Why the Green Point Shape Works
Row 1 places 3 dc on each side of the point.
Row 2 adds one additional dc per side through the tip space while keeping the ch-2 tip open.
The wedge therefore widens by one stitch per side while maintaining a sharp corner.
This produces a clean green chevron that points directly outward from the white center.
Green Wedge Checkpoint
After completing all six green wedges, measure from one green tip to the opposite green tip.
The measurement should be approximately:
4.25 in (10.8 cm).
Weave all green yarn tails into the back of their respective green wedges, except for the long tail reserved for the hanging loop.
Keep the tails within the green section so that no green yarn shows through the white front of the ornament.
White Picot Edging
The final white edging outlines the complete snowflake.
It travels up each green wedge to the point, moves down the opposite side, dips into the white valley fan, and continues around the next wedge.
This edging also helps define the six-point snowflake shape.
Border Gauge
Approximately 6 sc per inch (2.5 cm) along the wedge sides.
Work the single crochet stitches snugly enough to keep the green edges straight, but avoid pulling them so tightly that the ornament puckers.
Edging Round
Join white yarn with a sl st in the ch-2 tip space of any green wedge.
Ch 1.
Work the following sequence:
1. Tip:
Work (sc, ch 3, sc) in the tip ch-2 space.
This creates 2 sc and 1 picot.
2. Down the wedge:
Sc in each of the next 5 dc of Row 2. The final stitch is the Row 2 turning chain.
5 sc
3. Row-end:
Work 2 sc over the side of Row 1.
2 sc
4. Round 4 space:
Sc in the next ch-2 space of Round 4.
1 sc
5. Valley fan:
Sc in the next 2 dc.
Work (sc, ch 3, sc) in the center dc.
Sc in the next 2 dc.
6 sc and 1 picot
6. Round 4 space:
Sc in the next ch-2 space.
1 sc
7. Row-end:
Work 2 sc over the side of Row 1 of the next wedge.
2 sc
8. Up the wedge:
Sc in each of the next 5 dc of Row 2, ending next to the tip.
5 sc
Repeat the complete sequence from * 5 more times.
On the final repeat, skip the first tip step because that tip has already been worked.
Sl st to the first sc.
Fasten off and weave in the end.
Edging Stitch Count
Each repeat contains:
2 + 5 + 2 + 1 + 6 + 1 + 2 + 5 = 24 sc and 2 picots
For six repeats:
- 144 sc total
- 12 picots total
Why the Border Math Works
Round 1 contains 12 dc, creating 12 spaces in Round 2 and 12 V-stitches in Round 3.
Those V-stitches alternate into:
- 6 points
- 6 valleys
Each green point wedge contains 5 dc per side, while each white valley fan contains 5 dc.
Because all six sections are identical, the edging works evenly around the entire ornament and finishes with:
144 sc and 12 picots.
Final Size Checkpoint
Before blocking, the completed snowflake should measure approximately:
4.5 in (11.4 cm) point to point.
The white edging contributes approximately 0.125 in (0.3 cm) along each tip.
Hanging Loop
Use the long green yarn tail reserved from the top green wedge.
Thread the tail through the tip picot from back to front.
Chain 16 using the tail, or fold the tail into a loop approximately:
2.5 in (6.4 cm) long.
Tie the loop securely at the base of the picot using a double knot.
Weave the short end into the back of the green wedge.
If you prefer to add the hanging loop after blocking, cut a new 25 cm (9.8 in) piece of green yarn and attach it in the same way.
Final Blocking and Starching
Blocking transforms the soft crochet motif into a crisp snowflake with clearly defined points.
For the sharpest result, starch-blocking is recommended.
1. Wet the Snowflake
Soak the finished ornament in cool water for several minutes.
Gently press out excess water using a towel.
Do not wring or twist the crochet.
2. Apply Stiffener
Dip the ornament into diluted fabric stiffener, or lay it flat and apply spray starch generously.
Press out any excess stiffener.
3. Pin the Center
Place the snowflake right side up on the blocking mat.
Pin through the center hole to anchor the motif.
4. Pin the Six Points
Pin each green tip picot outward at evenly spaced intervals.
Shape the snowflake until the point-to-point measurement is:
4.5 in (11.4 cm).
Adjacent tips should be approximately:
2.25 in (5.7 cm) apart.
5. Pin the Valleys
Pin each valley picot so that the valley-to-valley measurement is:
3.5 in (8.9 cm).
6. Shape the Open Spaces
Use a pin or crochet hook to gently open the Round 2 and Round 3 spaces.
Make sure the white spokes and V-stitches appear even.
7. Allow the Ornament to Dry
Let the snowflake dry completely, usually for approximately 6–12 hours.
Do not remove the pins until the ornament is completely dry and firm.
Final Quality-Control Checklist
Before displaying your Peppermint Frost Snowflake Ornament, check the following:
- The snowflake is one single crocheted piece.
- There are six points and six valleys.
- The center hole is small and securely closed.
- The center tail is woven in securely.
- Round 1 contains 12 dc.
- Round 3 contains 12 V-stitches.
- All six green wedges contain 10 dc, with 5 dc on each side of the ch-2 tip.
- All six white valley fans contain 5 dc.
- The edging contains 144 sc.
- The edging contains 12 picots.
- No green yarn tails show through the front.
- The finished size is approximately 4.5 in (11.4 cm) point to point.
- The finished valley-to-valley measurement is approximately 3.5 in (8.9 cm).
- The snowflake lies completely flat after blocking.
- The hanging loop is securely knotted at the top point.
Troubleshooting the Snowflake Ornament
The Center Cups or Bowls
Your chains may be too tight.
Loosen the ch-2 spaces in Round 2 or move up one hook size.
The Center Ruffles
Your chains may be too loose, or you may have accidentally added stitches.
Recount Round 2 and make sure you have exactly 12 dc.
The Green Wedges Lean to One Side
Check Row 1 carefully.
You should have exactly 3 dc on each side of the ch-2 tip.
In Row 2, make sure you finish in the top of the turning chain.
The Green Tips Look Rounded Instead of Sharp
Keep the ch-2 tip open in both rows.
During blocking, pin the tip picot firmly outward.
The White Edging Puckers Along the Green Wedges
Work the 2 sc over the Row 1 row-end slightly more loosely.
If puckering continues, work that row-end with 2 hdc instead.
The Edging Waves or Flares
You may have worked more than 5 sc per wedge side.
Recount each repeat and make sure you are following the 24 sc per repeat calculation.
The White Edging Leaves Gaps at the Valleys
Work the sc into the Round 4 ch-2 space firmly.
Push the stitch down into the space before continuing to the valley fan.
Green Yarn Shows Through the White
Weave the green yarn tails only into the back of the green wedge.
Follow the dc posts on the back of the work rather than carrying the yarn into the white sections.
Care Instructions
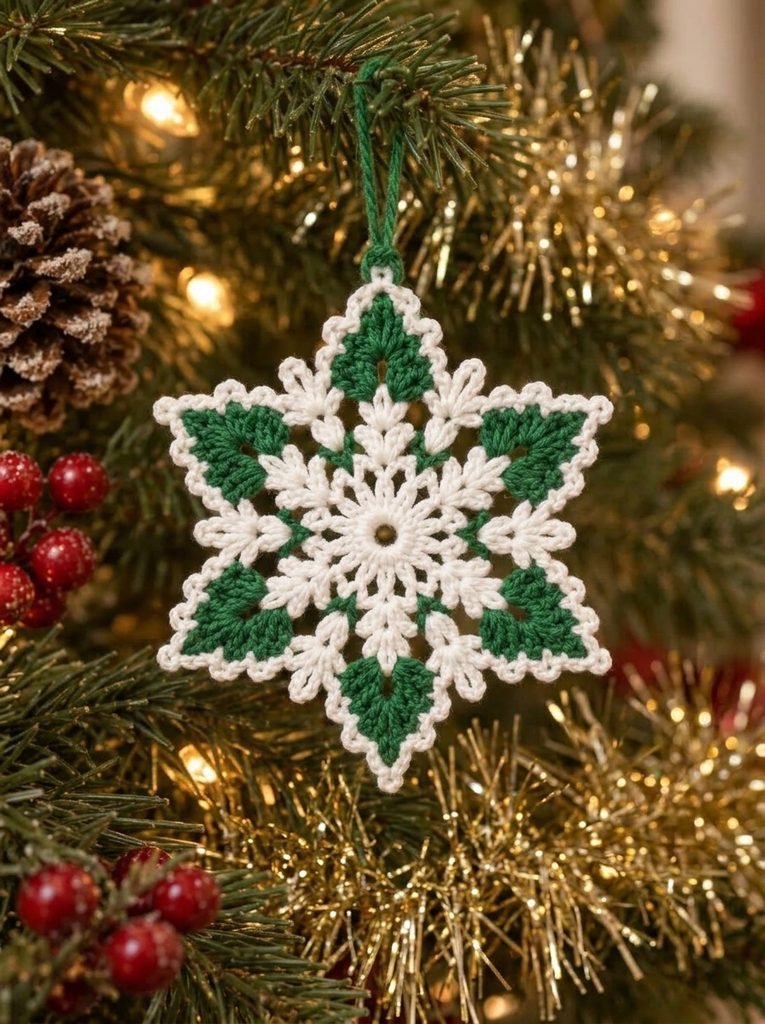
Spot clean the finished snowflake with a damp cloth when possible.
For more thorough cleaning, gently hand wash it in cool water.
After washing, reshape the snowflake and re-starch and re-block it to restore the crisp six-point shape.
Allow it to dry completely before storing or displaying it.
How to Use Your Crochet Snowflake Ornament
The Peppermint Frost Snowflake is versatile enough for many holiday projects.
Use it as:
- A Christmas tree ornament
- A handmade gift tag
- A package topper
- A holiday window decoration
- A winter garland
- A Christmas stocking decoration
- A handmade holiday gift
- A festive table or mantel accent
You can also crochet several snowflakes in coordinating color combinations and string them together to create a decorative Christmas garland.
Final Notes
This snowflake is built around a simple measurement chain that makes it easy to check your progress as you crochet.
Round 1 contains 12 dc and measures approximately 1 in (2.5 cm).
Round 3 contains 12 V-stitches and measures approximately 2.25 in (5.7 cm).
Round 4 divides the design into 6 points and 6 valleys and measures approximately 2.75 in (7.0 cm).
The six green wedges, each containing 10 dc, expand the snowflake to approximately 4.25 in (10.8 cm).
Finally, the 144-sc white picot edging brings the finished ornament to approximately 4.5 in (11.4 cm) point to point.
Checking the measurements at each checkpoint helps keep the finished snowflake balanced and symmetrical.
The combination of crisp white crochet and fresh green point wedges gives this ornament a festive winter appearance while keeping the pattern simple enough to customize.
Make several snowflakes in different colorways, attach them to wrapped gifts, or connect them together to create a beautiful handmade holiday garland.
Happy crocheting!
Crochet Categories
Category: Crochet
SEO-Friendly Tags
- Christmas crochet
- crochet snowflake
- crochet snowflake ornament
- crochet ornament pattern
- Christmas ornament crochet
- holiday crochet pattern
- snowflake ornament pattern
- crochet Christmas decoration
- beginner lace crochet
- lace crochet ornament
- winter crochet pattern
- handmade Christmas decoration
- green and white crochet
- crochet holiday decor
- crochet tree ornament
Suggested SEO Title
Peppermint Frost Snowflake Ornament Crochet Pattern
Suggested Meta Description
Crochet a beautiful Peppermint Frost Snowflake Ornament with this detailed pattern featuring a white lace center, green chevron points, picot edging, and easy blocking instructions.
Suggested URL Slug
peppermint-frost-snowflake-ornament-crochet-pattern
Suggested Focus Keyword
Peppermint Frost Snowflake Ornament Crochet Pattern
Suggested Secondary Keywords
- crochet snowflake ornament
- Christmas crochet ornament
- crochet snowflake pattern
- Christmas tree crochet decoration
- crochet holiday ornament
- handmade snowflake ornament
- green and white crochet ornament
- winter crochet pattern
- crochet Christmas decoration
Suggested Pinterest Description
Create a beautiful handmade Peppermint Frost Snowflake Ornament with this detailed crochet pattern. The design combines a delicate white lace center with six green chevron points and a pretty white picot border. Perfect for Christmas trees, gift wrapping, winter garlands, holiday decorating, and handmade gifts.
Suggested Image Alt Text
Peppermint Frost Snowflake Ornament crochet pattern with white lace center, green pointed wedges, and picot edging
Suggested Image Caption
Peppermint Frost Snowflake Ornament crocheted in white and green cotton, perfect for Christmas decorating and handmade gifts.