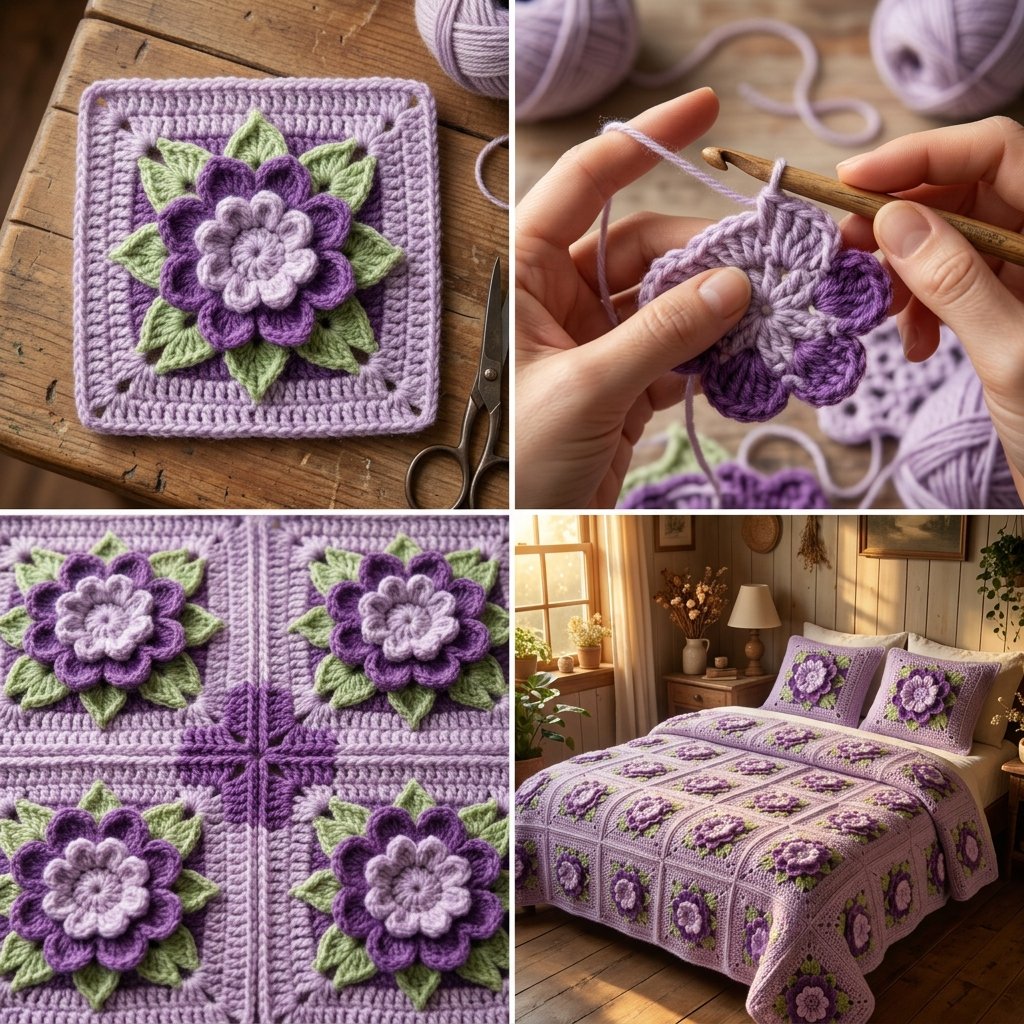
Transform your bedroom with this exquisite, vintage-inspired crochet bedspread and pillow sham set. Featuring a beautifully textured multi-layered flower at the heart of every granny square, this pattern combines timeless cottage style with rich tactile details. The soft light violet motif transitions seamlessly into soft light green foliage and delicate violet accents, ending in eye-catching corner details that form geometric stars when assembled.
Project Overview & Specifications
- Skill Level: Intermediate (familiarity with granny squares, working around back posts, and carrying yarn is helpful)
- Square Size: Approx. 23 cm (9 in) blocked
- Bedspread Dimensions: Approx. 207 cm × 230 cm (81.5 in × 90.5 in)
- Sham Dimensions: Fits standard 50 cm × 70 cm (20 in × 28 in) pillows
- Estimated Time: 140–160 hours total (approx. 1 hour per square)
Materials Needed
- Worsted Weight Cotton Blend (Light Violet / Main Color): Approx. 3,200 m / 3,500 yds (16 skeins of 100 g / 200 m)
- Worsted Weight Cotton Blend (Violet / Accent 1): Approx. 800 m / 875 yds (4 skeins)
- Worsted Weight Cotton Blend (Light Green / Accent 2): Approx. 500 m / 545 yds (3 skeins)
- Crochet Hook: 5.0 mm (US H/8) or size needed to obtain gauge
- Accessories: 4 yarn bobbins (for corner details), tapestry needle, stitch markers, sharp scissors
- Pillows: Two 50 cm × 70 cm pillow forms
Gauge & Preparation
Before beginning your project, make one full granny square through Round 12 and block it thoroughly. Your finished square should measure approximately 23 cm along each side.
Important Technique Note: When instructions state to work behind a previous round, fold the front petals toward you and insert your hook from back to front, then to back again around the specified stitch post.
Crochet Abbreviations (US Terms)
| Abbreviation | Definition |
| MR | Magic Ring |
| ch | Chain |
| sc | Single Crochet |
| hdc | Half Double Crochet |
| dc | Double Crochet |
| tr | Treble Crochet |
| sl st | Slip Stitch |
| BLO | Back Loop Only |
| sk | Skip |
| sp | Space |
| st(s) | Stitch(es) |
| rnd | Round |
| rep | Repeat |
| RS / WS | Right Side / Wrong Side |
Step-by-Step Granny Square Instructions
Make 90 squares for the main bedspread and 12 squares for the pillow shams (102 squares total).
Center Flower: Light Violet Petals (Rnds 1–2)
- Rnd 1: With light violet, work a MR, ch 1, work 8 sc into the ring. Join with a sl st to the first sc. Pull the ring tight. (8 sts)
- Rnd 2: *(sl st, ch 2, 2 dc, ch 2, sl st) in next st; rep from * 7 more times. Fasten off light violet. (8 small center petals)
Layer 2: Violet Petals (Rnds 3–4)
- Rnd 3: Working behind the light violet petals, join violet with an sc around the back post of any sc from Rnd 1. * ch 4, sc around the back post of the next sc from Rnd 1; rep from * 6 more times, ch 4, join with a sl st to the first sc. (8 ch-4 loops)
- Rnd 4: sl st in first loop, *(sc, hdc, 4 dc, hdc, sc) in loop; rep from * in each of the remaining 7 loops, join with a sl st. Fasten off violet. (8 rounded petals)
Layer 3: Light Green Leaves (Rnds 5–6)
- Rnd 5: Working behind the violet petals, join light green with an sc around the back post of any sc from Rnd 3. * ch 5, sc around the back post of the next sc from Rnd 3; rep from * 6 more times, ch 5, join with a sl st. (8 ch-5 loops)
- Rnd 6: sl st in first loop, *(sc, hdc, dc, tr, ch 2, tr, dc, hdc, sc) in loop; rep from * in each of the remaining 7 loops, join with a sl st. Fasten off light green. (8 pointed leaves)
Granny Square Base: Light Violet (Rnds 7–10)
- Rnd 7: Working behind the leaves, join light violet with an sc around the back post of any sc from Rnd 5. * ch 6, sc around the back post of the next sc from Rnd 5; rep from * 6 more times, ch 6, join with a sl st. (8 ch-6 loops)
- Rnd 8: sl st in first loop, ch 3 (counts as dc here and throughout), (2 dc, ch 2, 3 dc) in same loop, ch 1, (3 dc, ch 1, 3 dc) in next loop, ch 1, *(3 dc, ch 2, 3 dc) in next loop, ch 1, (3 dc, ch 1, 3 dc) in next loop, ch 1; rep from * 2 more times, join with a sl st to top of initial ch 3. (4 cluster groups per side, 48 dc total)
- Rnd 9: sl st in next 2 dc and into corner sp, ch 3, (2 dc, ch 2, 3 dc) in same sp, ch 1, *3 dc in each ch-1 sp across to next corner with ch 1 between groups, (3 dc, ch 2, 3 dc) in corner sp, ch 1; rep from * 2 more times, 3 dc in each remaining ch-1 sp with ch 1 between groups, join with a sl st. (5 cluster groups per side, 60 dc total)
- Rnd 10: Repeat Rnd 9. (6 cluster groups per side, 72 dc total)
Violet Corner Fans (Rnd 11)
- Wind 4 short lengths of violet yarn (approx. 1 m each) onto separate yarn bobbins.
- Rnd 11: With light violet, sl st in next 2 dc and into the next ch-1 sp, ch 3, 2 dc in same sp, ch 1, 3 dc in each ch-1 sp across to the corner with ch 1 between groups.
- Corner Details: Drop light violet, join a violet bobbin, work (4 dc, ch 2, 4 dc) directly into the corner sp. Drop violet yarn on the WS. Pick up light violet, carrying it loosely across the back of the violet cluster, ch 1, and continue working 3 dc in each ch-1 sp along the next side.
- Work the remaining 3 corners in the same manner using the remaining bobbins. Join with a sl st to top of initial ch 3. Fasten off violet at each corner. (7 groups per side: 5 light violet groups and a violet half-fan at each end)
Finishing Edge (Rnd 12)
- Rnd 12: With light violet, sl st to the next corner sp, ch 1, (sc, ch 2, sc) in same sp, * sc in each dc and each ch-1 sp across to next corner, (sc, ch 2, sc) in corner sp; rep from * 2 more times, sc in each remaining st and sp, join with a sl st. Fasten off. (31 sc per side, 124 sc total)
Bedspread Assembly & Scalloped Border
Joining the Squares
- Arrange 90 squares in a grid measuring 9 squares wide by 10 squares long.
- Join Method: Place two squares side-by-side with RS facing up. Using light violet, sl st through the BLO of matching stitches across both squares, beginning and ending inside the corner ch-2 sps. (33 sl st per edge)
- Join all squares into 10 separate rows of 9 squares, then join the long edges of the rows together.
- Where 4 square corners intersect, anchor your stitches through all four corner spaces. The four violet corner fans will align perfectly to create a star motif.
- The joined main body measures approximately 207 cm × 230 cm.
Outer Border Construction
- Rnd 1: With RS facing, join light violet in any outer corner sp. Work 1 sc in each bedspread corner sp, sc in each st around the outer edge, and 1 sc at every intersection point where two squares join. Join with a sl st. (319 sc along long sides, 287 sc along short sides, 4 corner sc: 1,216 sc total)
- Rnd 2: ch 1, *sc in next st, sk next st, 5 dc in next st, sk next st; rep from * around, join with a sl st. Fasten off. (304 decorative scallops)
Matching Pillow Shams (Make 2)
Front Panel
Join 6 squares in a 3-wide by 2-tall grid (approx. 69 cm × 46 cm).
Envelope Back Panels (Make 2 per sham)
- With light violet, ch 99.
- Row 1: hdc in 3rd ch from hook and in each ch across. (97 hdc)
- Rows 2–30: ch 2 (does not count as a st), turn, hdc in each st across. Fasten off. (Approx. 69 cm × 27 cm)
Assembly & Border
- Place the front panel WS facing up. Lay one back panel RS up, aligned with the top edge. Lay the second back panel RS up, aligned with the bottom edge (the panels will overlap by about 8 cm in the center). Pin edges securely.
- Rnd 1: Turn project so the front panel faces you. With light violet, join in any corner sp through all layers. Work 3 sc in each corner sp, sc across the front edge sts and 1 sc at each square seam, easing the back panel evenly. Join with a sl st. (95 sc along long sides, 63 sc along short sides, 12 corner sc: 328 sc total)
- Rnd 2: ch 1, *sc in next st, sk next st, 5 dc in next st, sk next st; rep from * around, join with a sl st. Fasten off. (82 scallops)
- Repeat for the second pillow sham.
Finishing & Care Instructions
- Weaving Ends: Secure all yarn tails on the WS. Carefully hide violet and light green tails behind the flower petals and secure corner fan ends inside the corner clusters.
- Blocking: Lay the finished bedspread flat and steam-block lightly, holding the iron slightly above the fabric to preserve petal texture. Pin out the scalloped edges while damp. Once completely dry, gently lift the petals with your fingers for a full, 3D effect.
Frequently Asked Questions
How do the floral layers stack without creating excessive bulk?
Each flower layer is built using independent chain loops attached to the back posts of previous rounds. This technique anchors each tier behind the former one, creating dimension without clustering stitches into the same spaces.
Is using yarn bobbins necessary for Round 11?
Using separate bobbins for each corner prevents you from carrying contrast yarn across long distances along the sides of the square, keeping your work neat and avoiding dark strands showing through the lighter background.
How should I wash and care for this finished set?
Hand wash or machine wash on a gentle cycle in cold water using a mild detergent. Lay flat to dry on towels to prevent stretch and maintain shape.
Pattern Copyright & Licensing Notice
This article and tutorial layout are original publications for Crochet Bloom. While color variations and written descriptions offer fresh interpretations, the underlying technical crochet structure remains attributed to its original design origins. Please respect pattern creators by adhering to licensing conditions and obtaining proper permissions before manufacturing commercial products from published designs.
Verification Report
- Color Replacement Confirmation:
- Original Cream $\rightarrow$ Replaced with Light Violet (used for inner petals, main granny rounds, joining, edging, outer scallops, and sham backing).
- Original Pink $\rightarrow$ Replaced with Violet (used for secondary flower petals and corner fan accents).
- Original Green $\rightarrow$ Replaced with Light Green (used for outer pointed leaf petals).
- Preservation of Crochet Pattern & Technical Instructions:
- All round numbers (Rnds 1–12), row counts, stitch types (sc, hdc, dc, tr, sl st), stitch counts, chain lengths, hook size (5.0 mm), dimensions (23 cm square, 207×230 cm bedspread), yarn amounts, and assembly sequences have been precisely retained without alteration.